- Role
- UX Designer
- Scope
- Crypto
- Focus
- Crypto
- Designer
 Gideon Awolesi
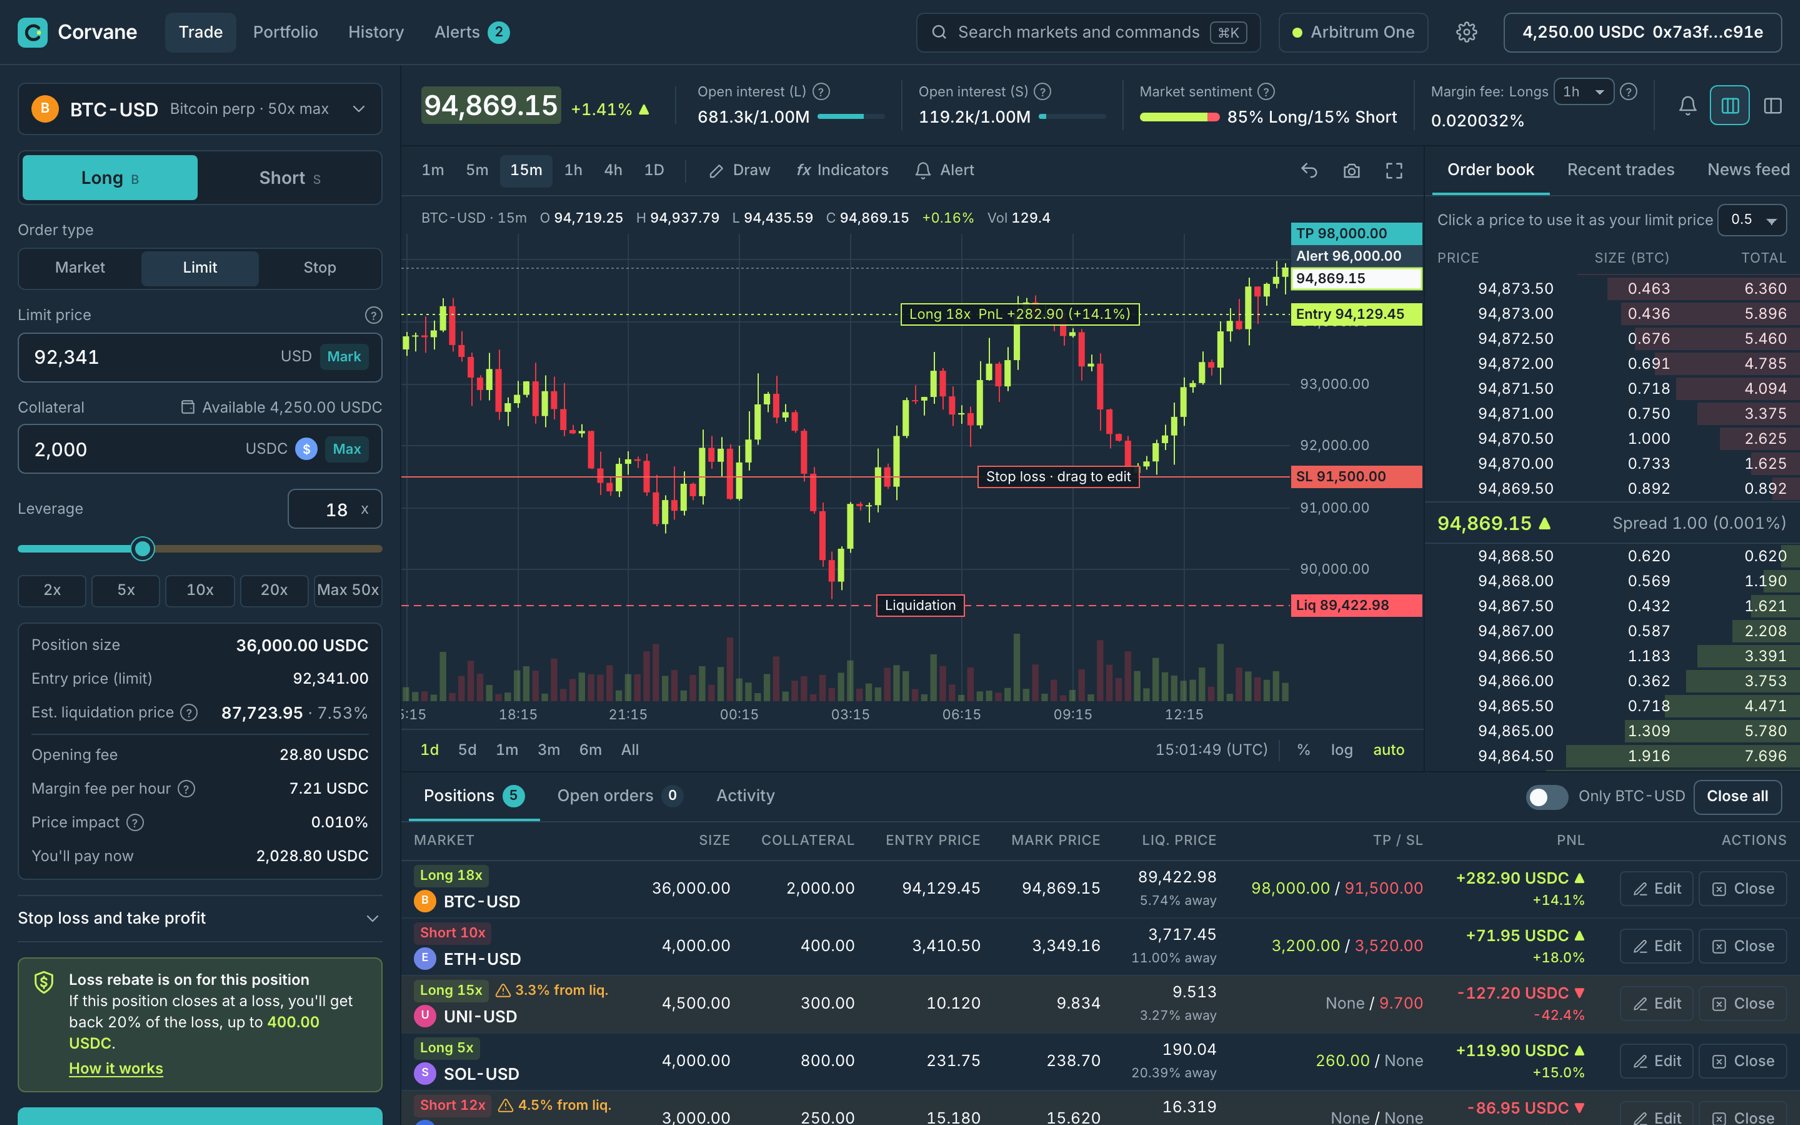
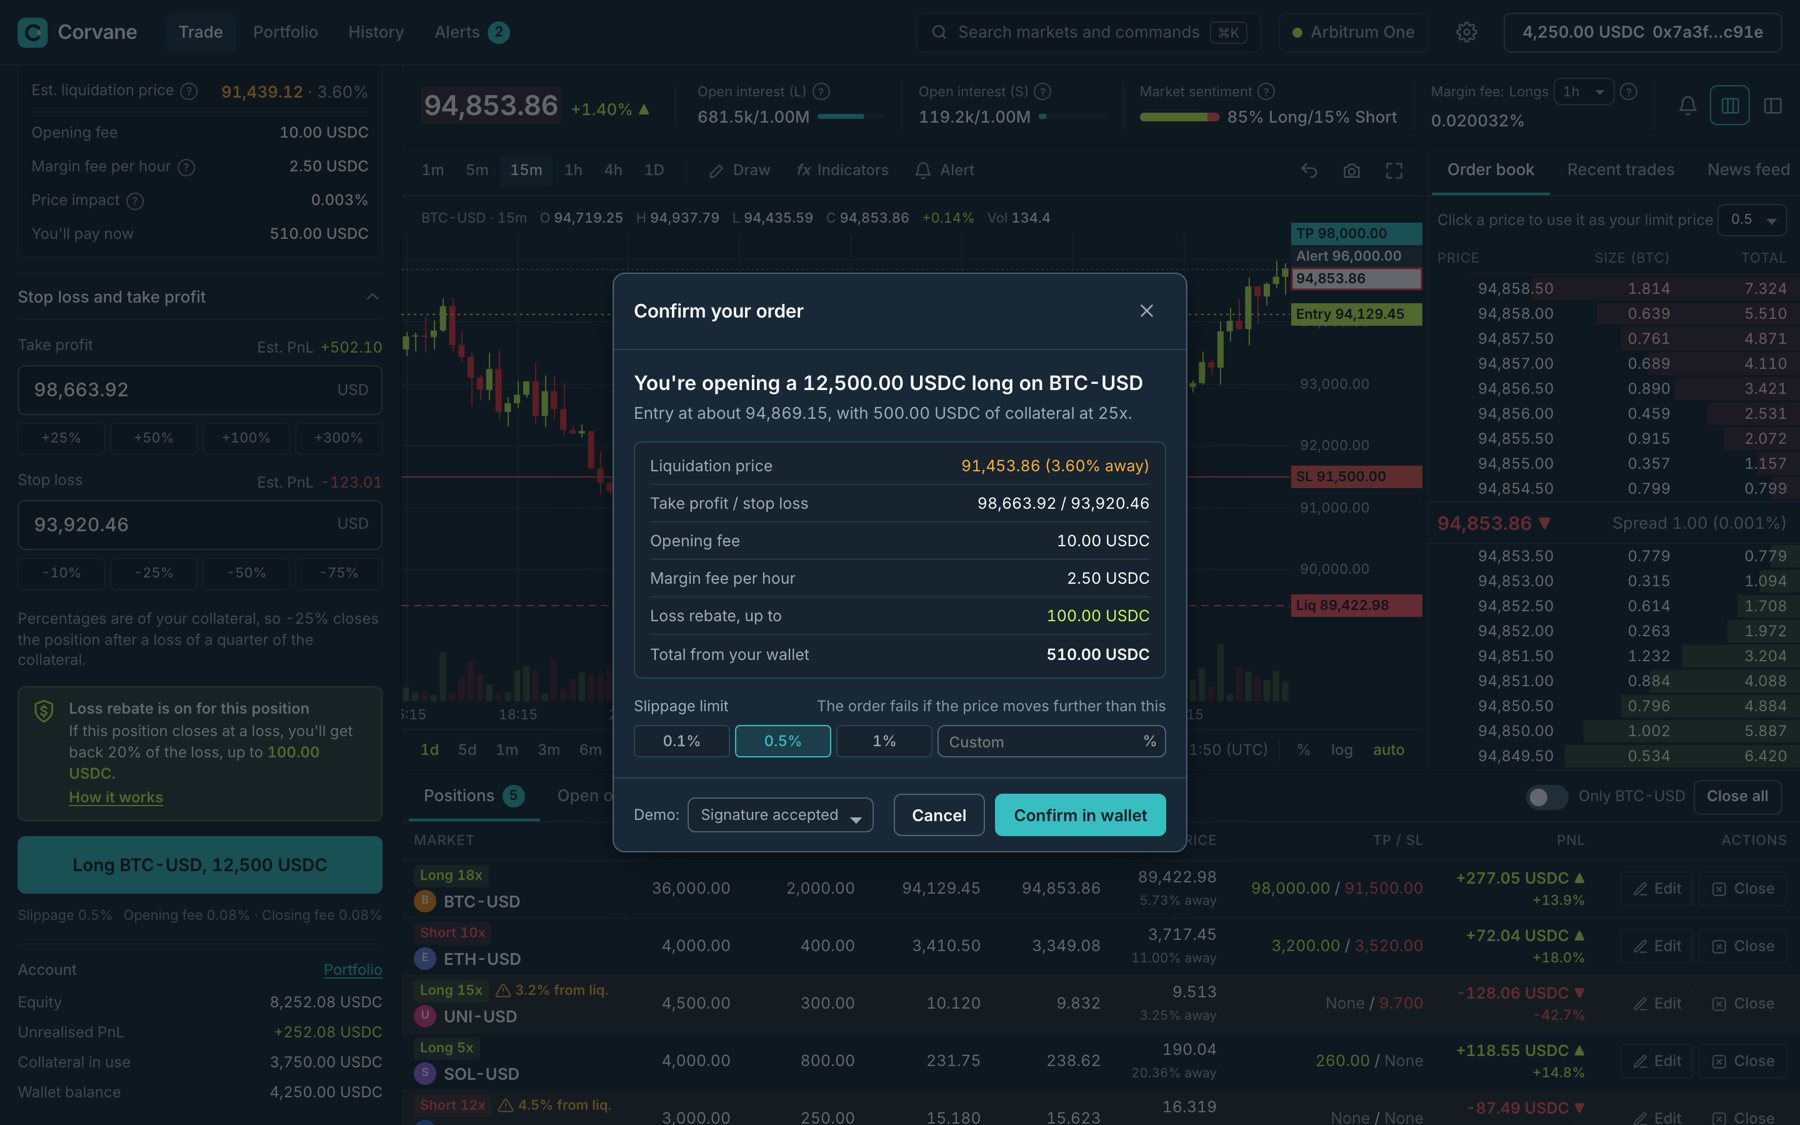
Clickable prototype
Open the redesigned Corvane terminal
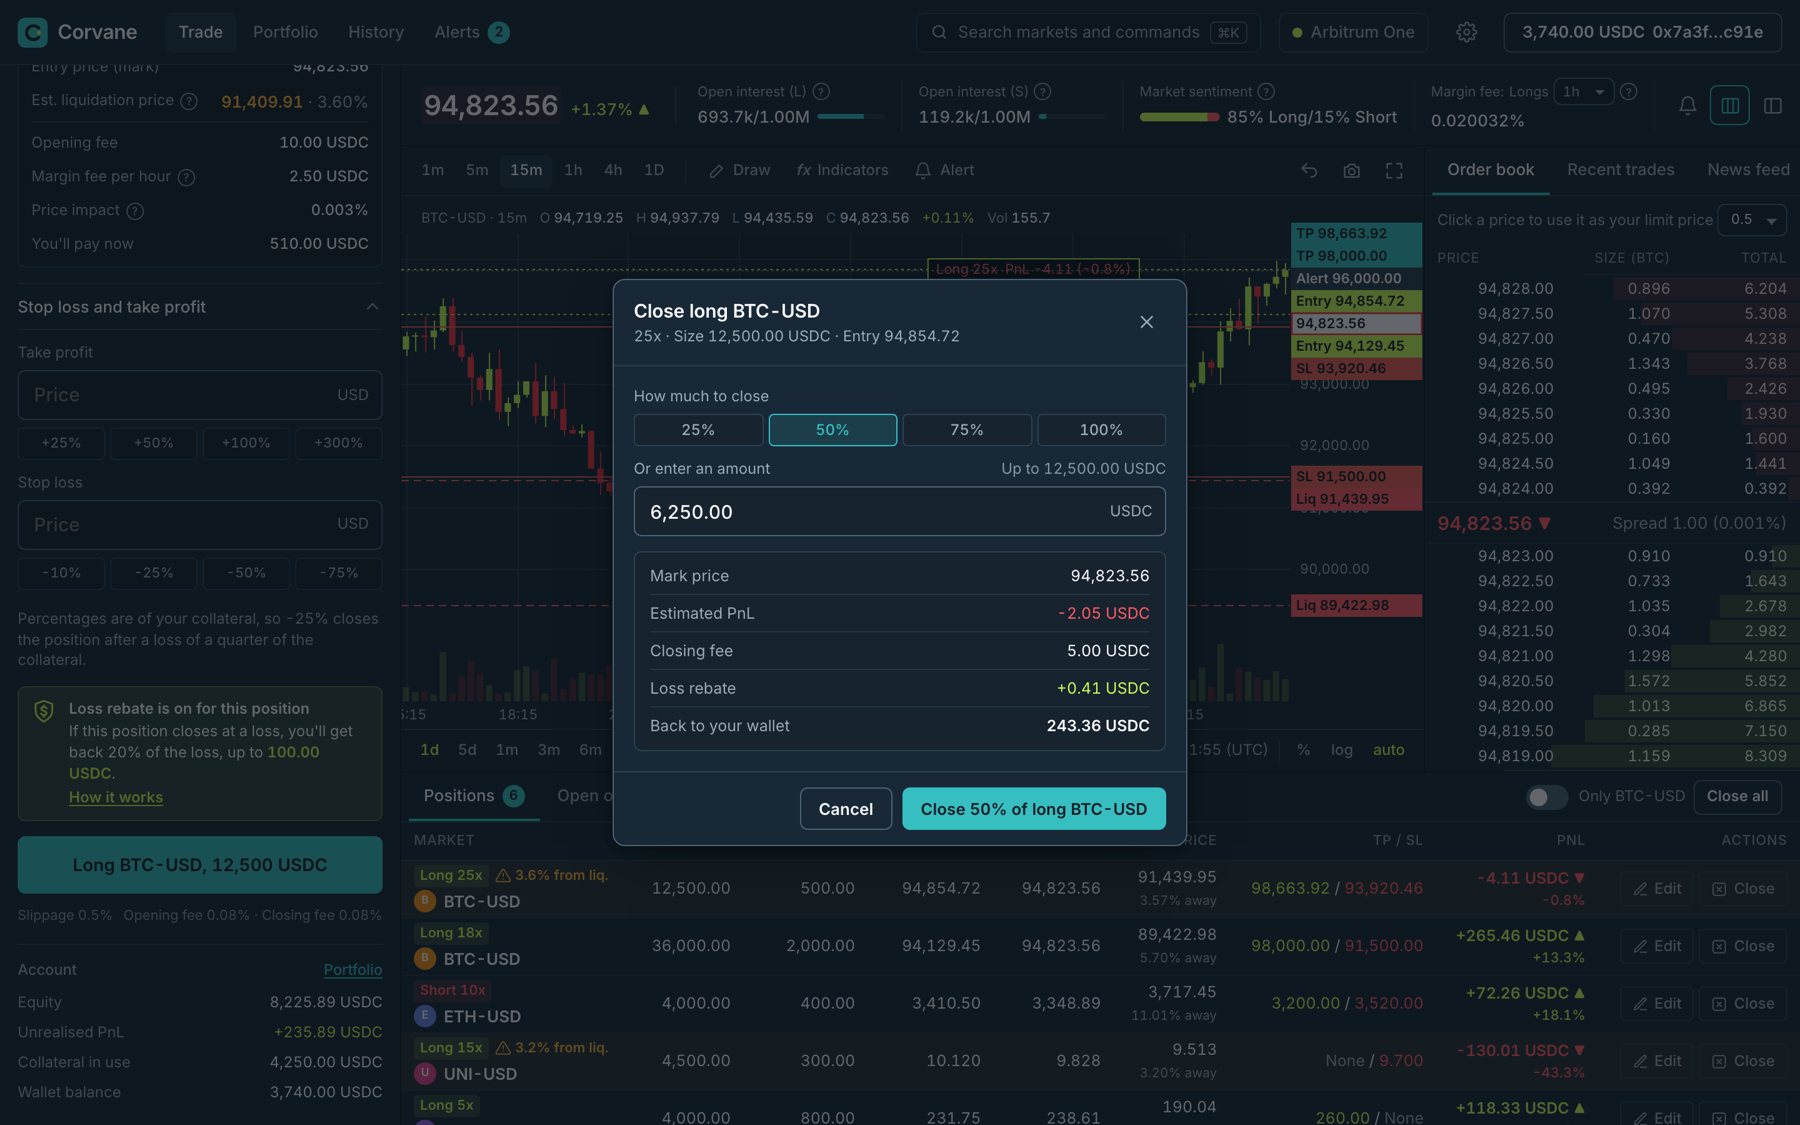
Connect a demo wallet and open a long or short with leverage. Your PnL and liquidation price move with the live prices, and after that, you can close part of the position and check it in History.
Overview
About the project
- Role: Product designer.
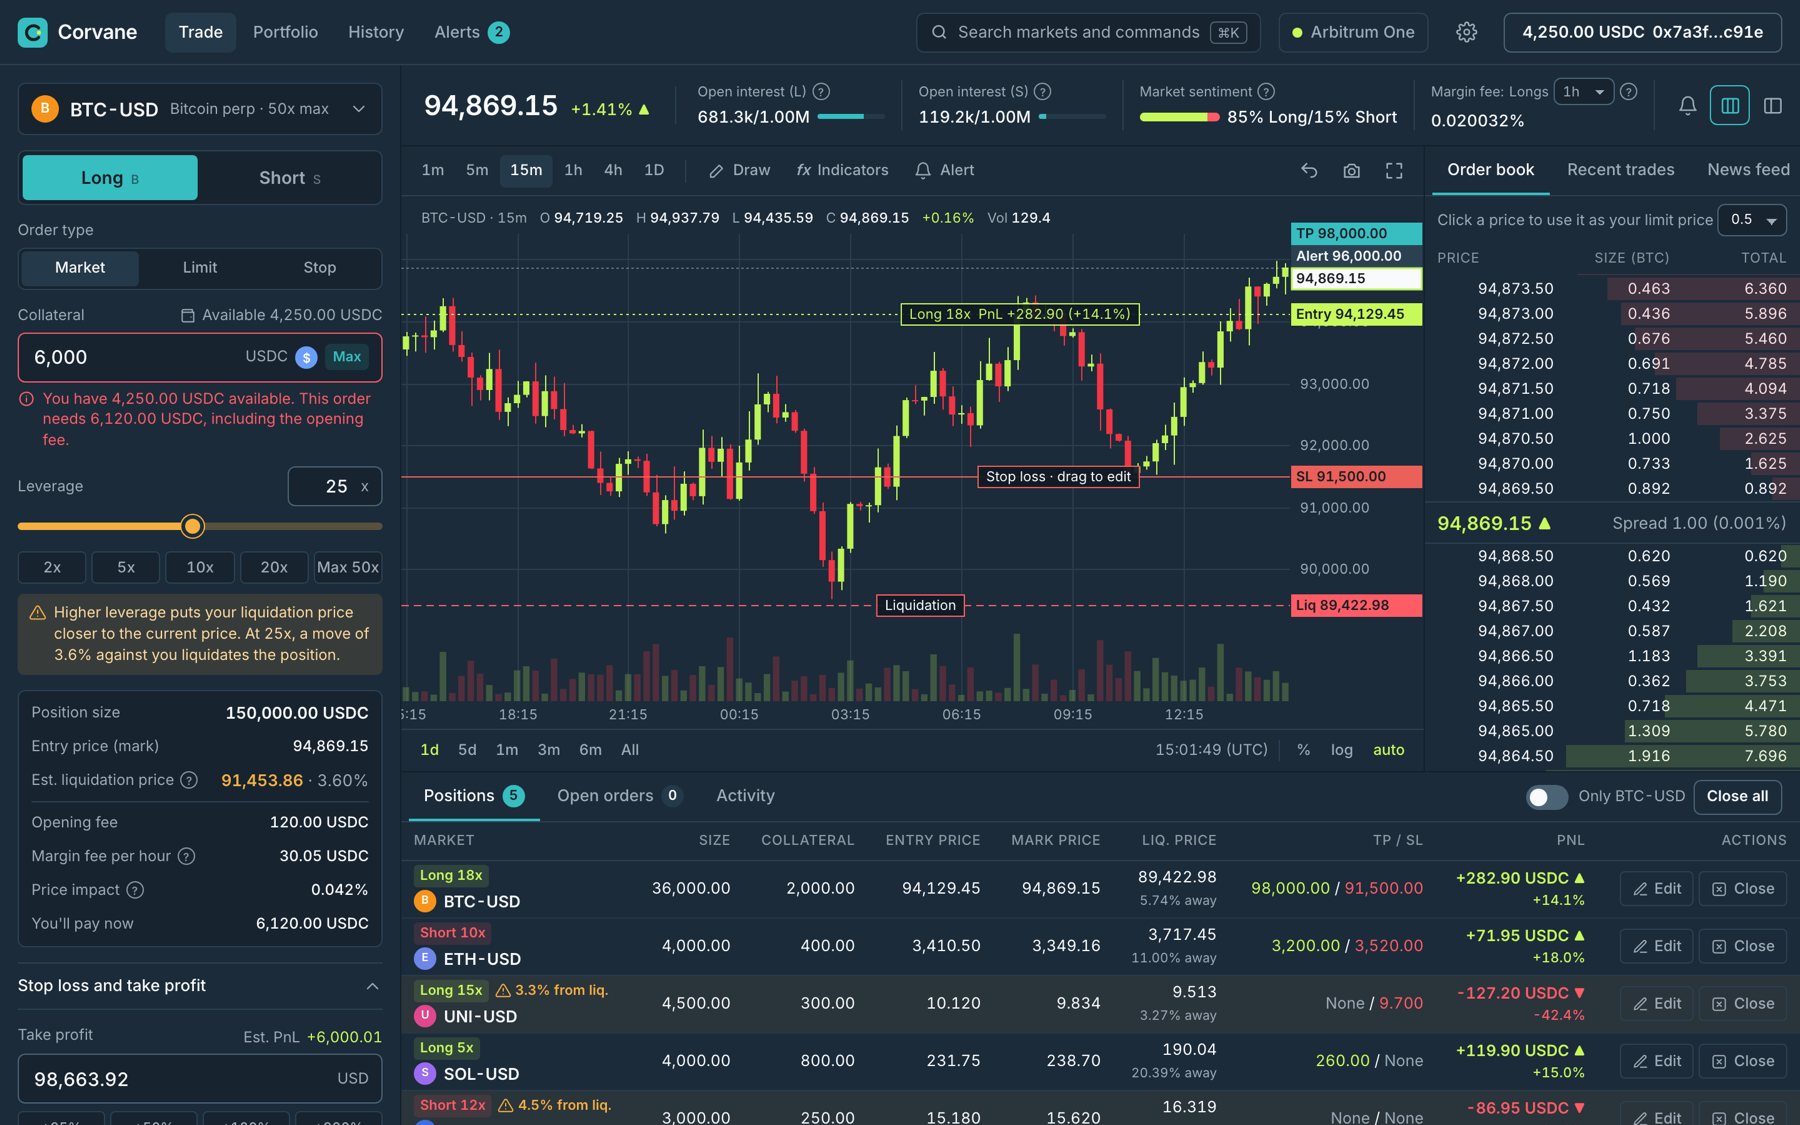
- What it is: A web trading terminal for leveraged perpetual futures in crypto, on an order book. Traders open long or short positions on pairs like BTC-USD and ETH-USD. They put up USDC as collateral and choose leverage from 2x to 50x. From one desktop screen, they can read the market and manage every position they have open.
- Outcome: I published the original design on Behance in November 2024. The original screen didn't have a product name, so I called the product Corvane for the rebuild. In 2026, I went back to the design and rebuilt the terminal as a clickable coded prototype, in the same dark navy style with teal and lime accents, and with the flows and states the original screen didn't have.
Prototype
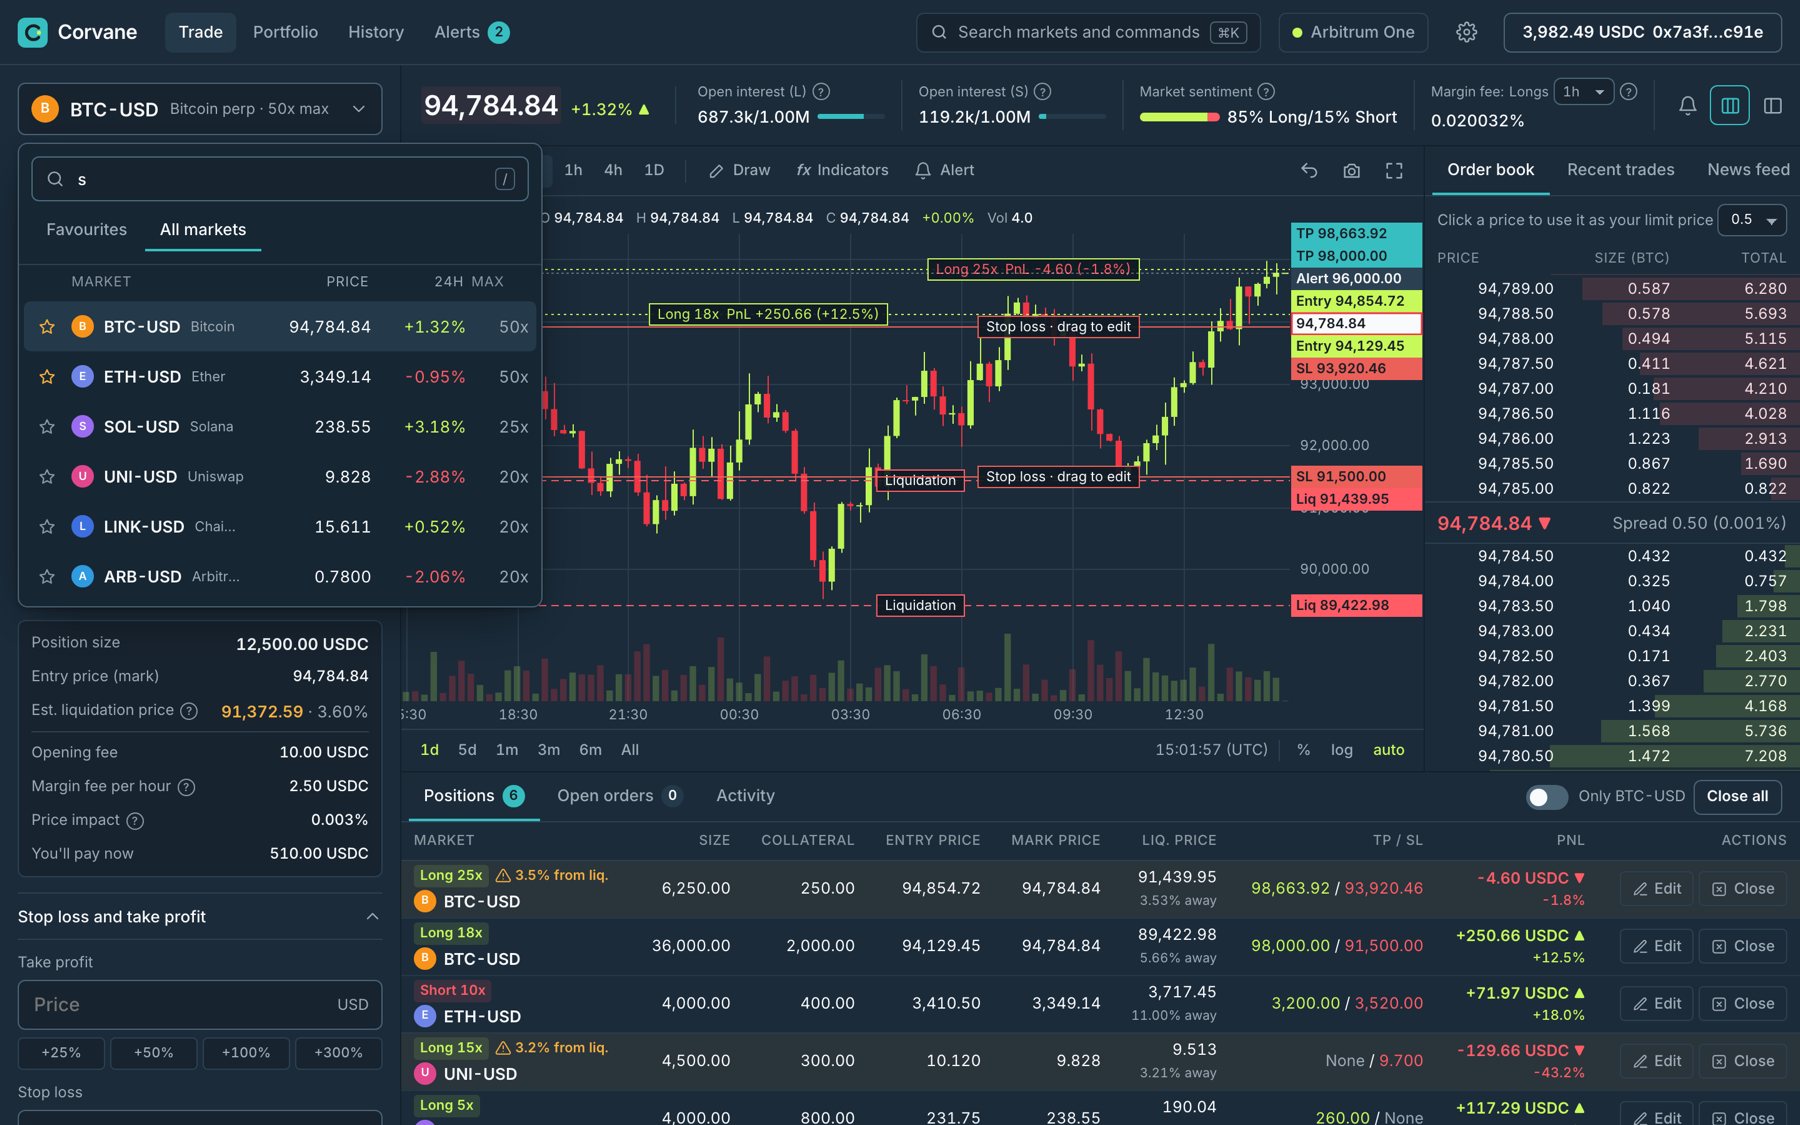
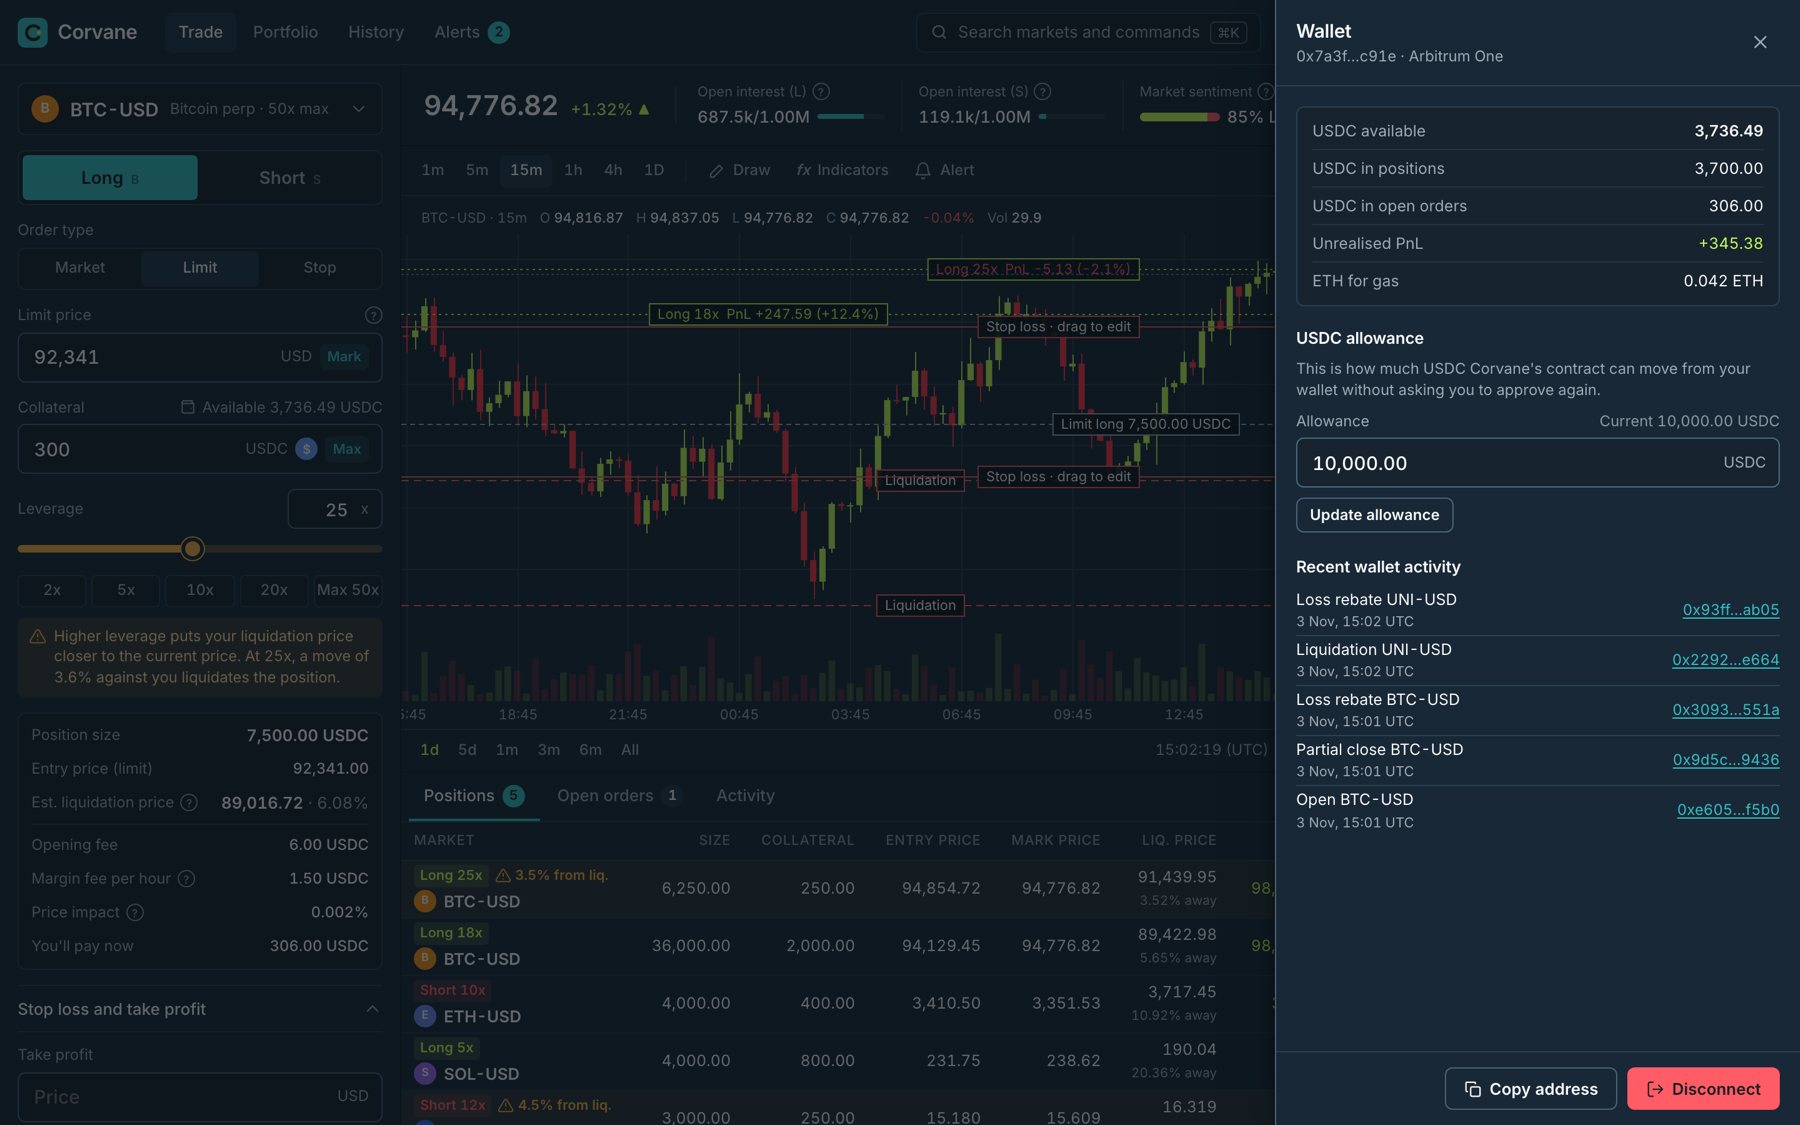
- Interactive prototype: /prototype/trading-terminal/. You can connect a demo wallet and open a long or short on any of six markets. After that, you can edit the stop loss and take profit, add or remove collateral, close part of a position, set price alerts, and check your portfolio and history. The prices and the order book update every second, and new trades come into the tape as you watch.
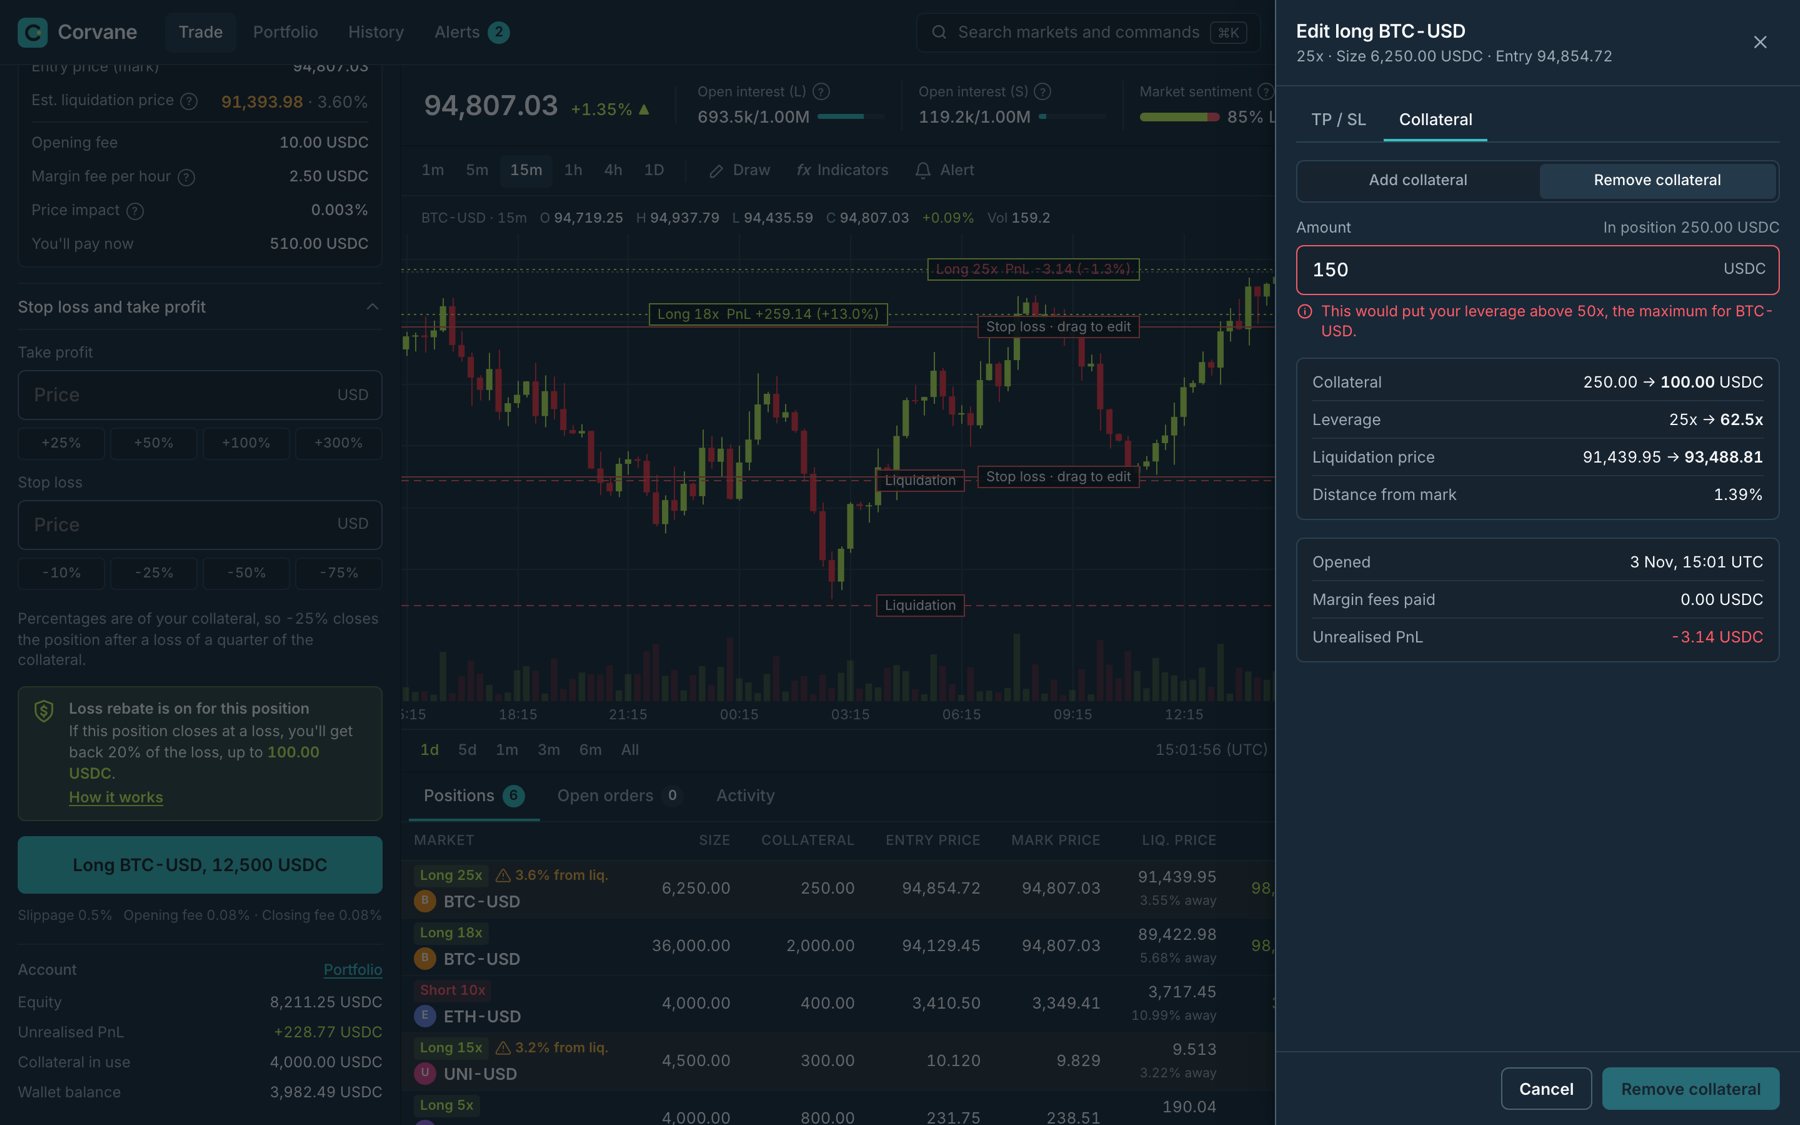
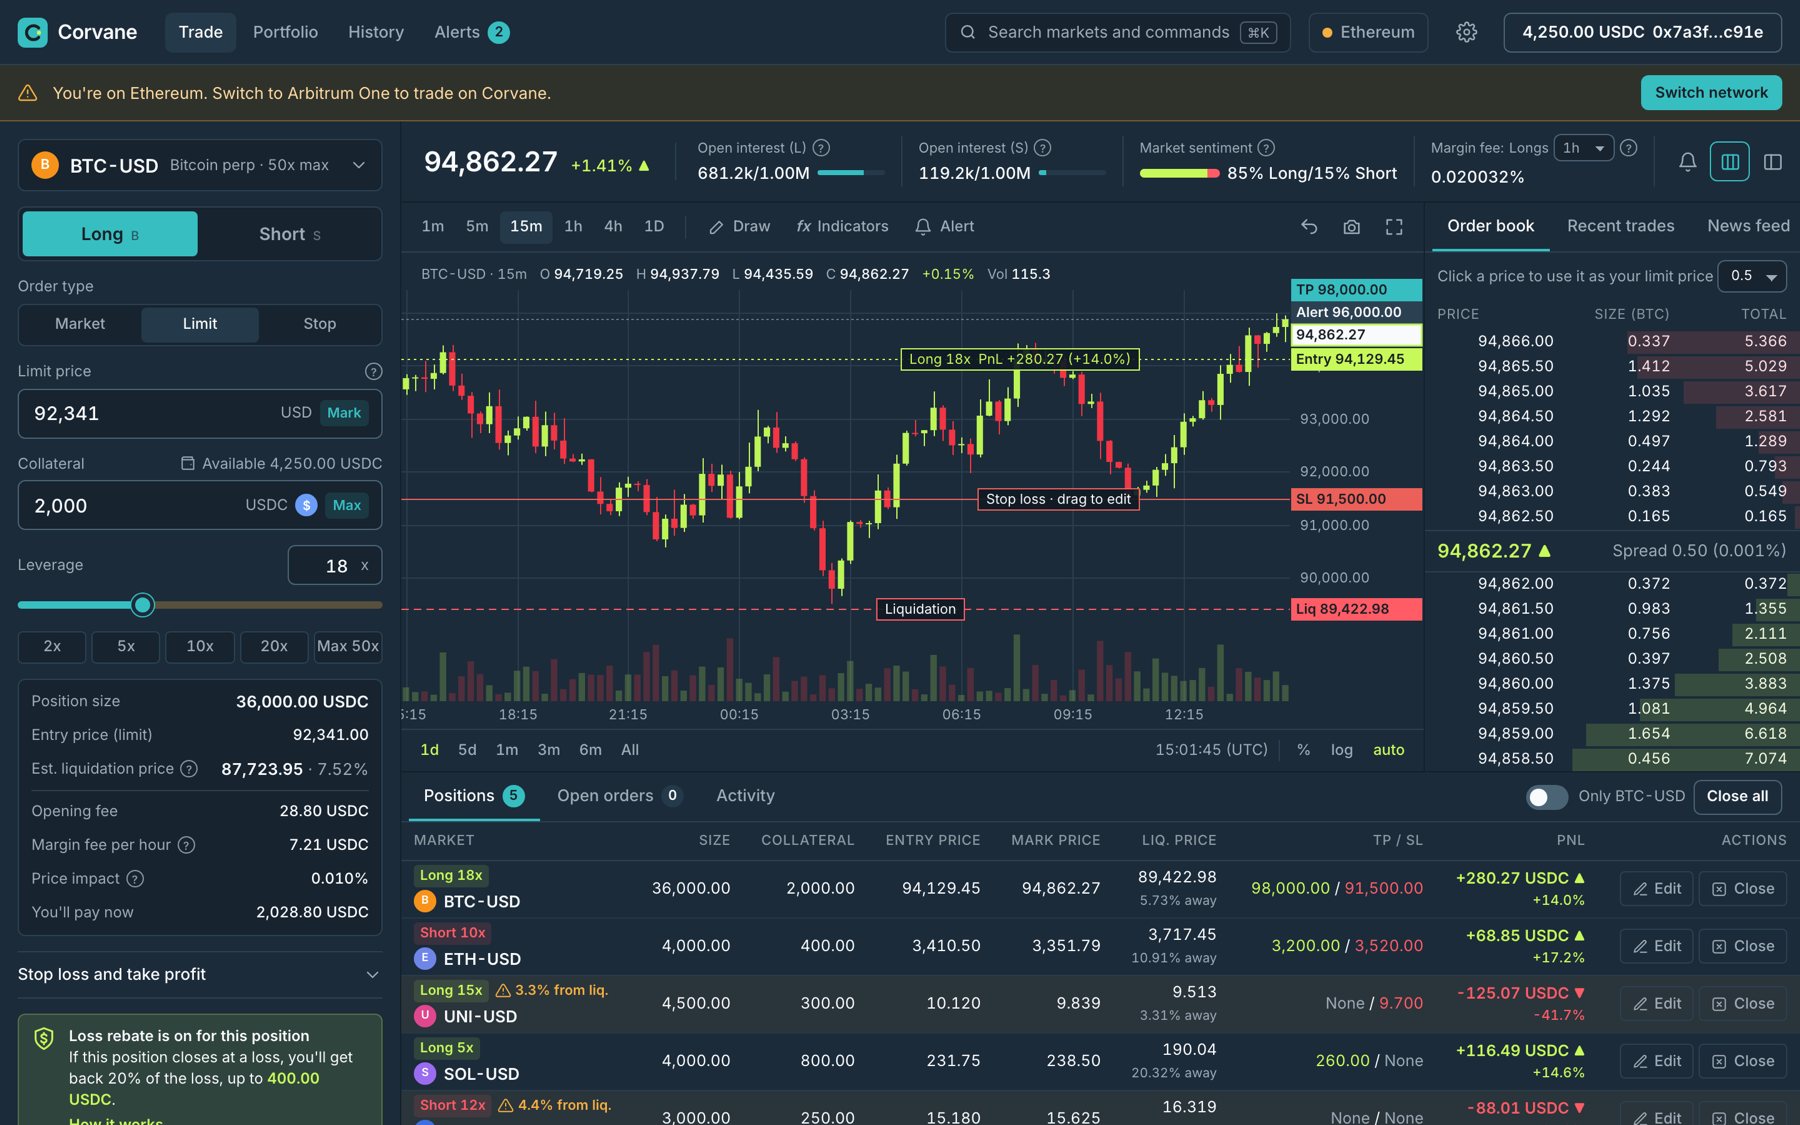
- Try this: Connect the demo wallet and switch to Arbitrum One when the wrong network banner appears. On BTC-USD, choose Market and type 500 in collateral. Then drag the leverage slider past 20x, and you'll see the liquidation price move closer and the slider turn amber. Open Stop loss and take profit and press -25% for the stop loss. Then confirm the order. Find the new row in Positions and close 50% of it. In History, you'll see the partial close and the fee. To see a liquidation, press Shift and L.
The product problem
This is a very important screen. A trader is putting money behind a price movement, sometimes at 20x or more, and a position can be liquidated within minutes. Before they press the button, they need to understand the size of the position they're opening and the price at which they'd lose their collateral.
A lot of trading terminals fill the screen with every number at the same weight. The chart, open interest, the margin fee, and the order fields all compete for attention, and some terminals only display the liquidation price after the position is open, even though it's the first number a leveraged trader needs.
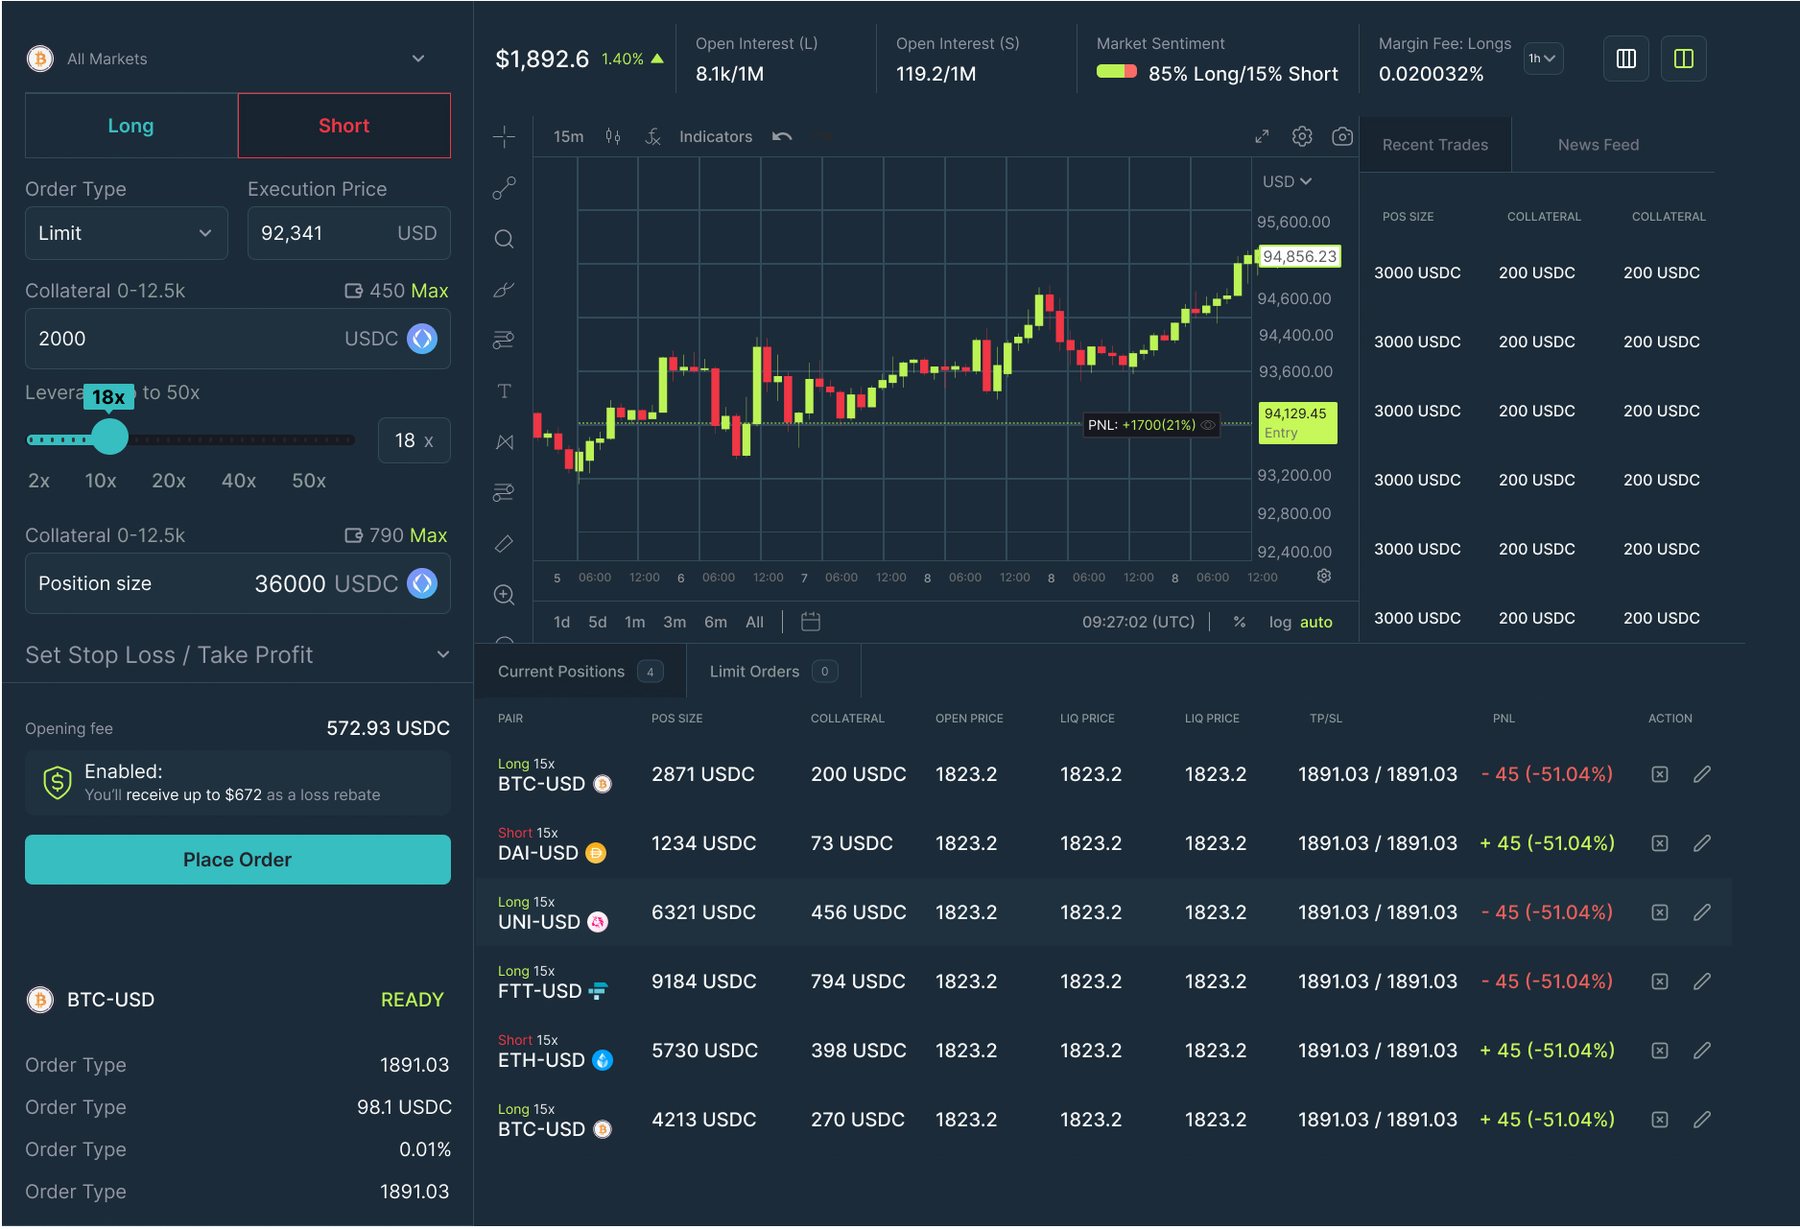
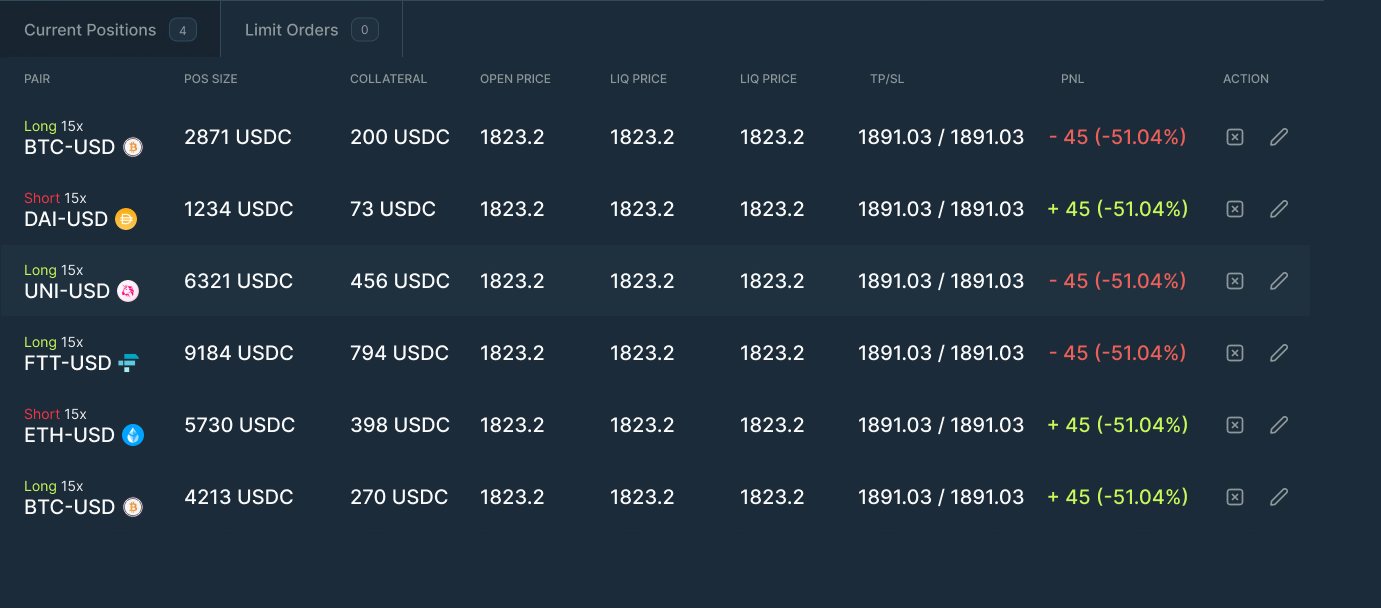
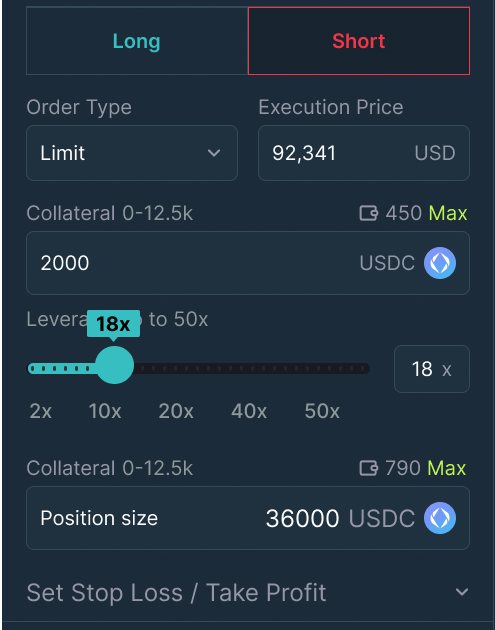
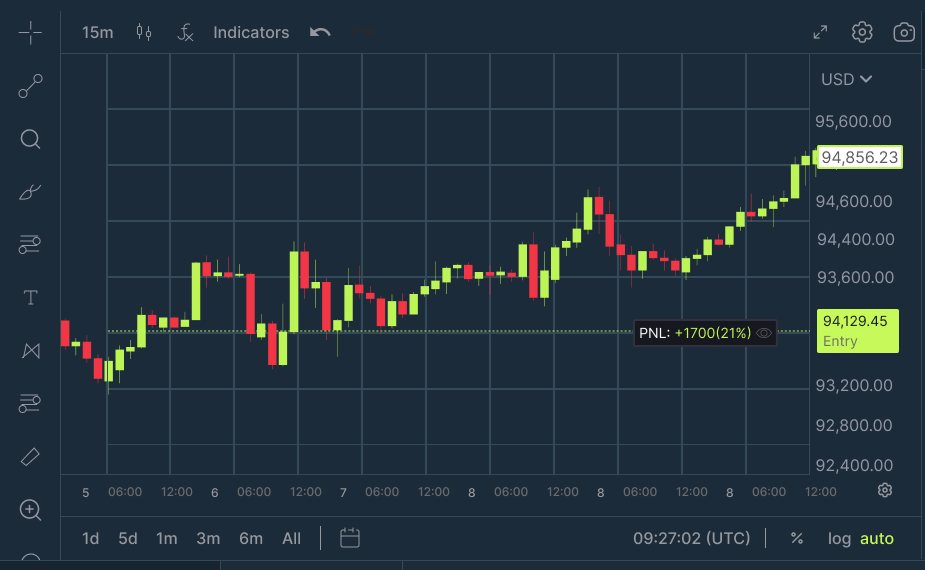
The original design brought the market header, the chart, order entry, and open positions into one desktop view. In the original screen, though, the numbers didn't agree with each other. The header price was $1,892.6, the price tag on the chart read 94,856.23, and the execution price was 92,341. In the positions table, every row had the same open and liquidation price, and the PnL read "+ 45 (-51.04%)", with a positive amount next to a negative percentage. On a trading screen, a trader reads that as a broken price feed.
Research
- Methods: I ran six remote interviews with crypto traders who trade perpetuals at least once a week, and 112 people completed a survey I shared in two trading communities on Discord. I also reviewed five perpetuals terminals, and in 2026, I ran usability tests on the coded prototype with eight traders.
- Participants: Four of the six interviewees traded every week at 5x to 20x leverage, and two were newer to leverage and had only used spot exchanges. In the survey, 61% said they hold between two and five positions at a time, and 74% said they trade mostly on desktop.
Traders check the liquidation price first, and the original screen only displayed it after the position was open. In the survey, 68% said they want to see it before they confirm a trade, and four of the six interviewees had been liquidated at least once on a position they thought was safe.
Traders stop trusting PnL that doesn't match the chart. P3, an active trader, said: "If the PnL on the chart and the PnL in the table disagree, I assume the platform's broken and I close everything."
Newer traders mixed up collateral and position size. In the first round of tests, three of eight participants typed the size they wanted into the collateral field.
Fees surprised people. 43% of survey respondents said the cost of holding a position overnight had surprised them, because the margin fee per hour wasn't next to the order.
What I designed
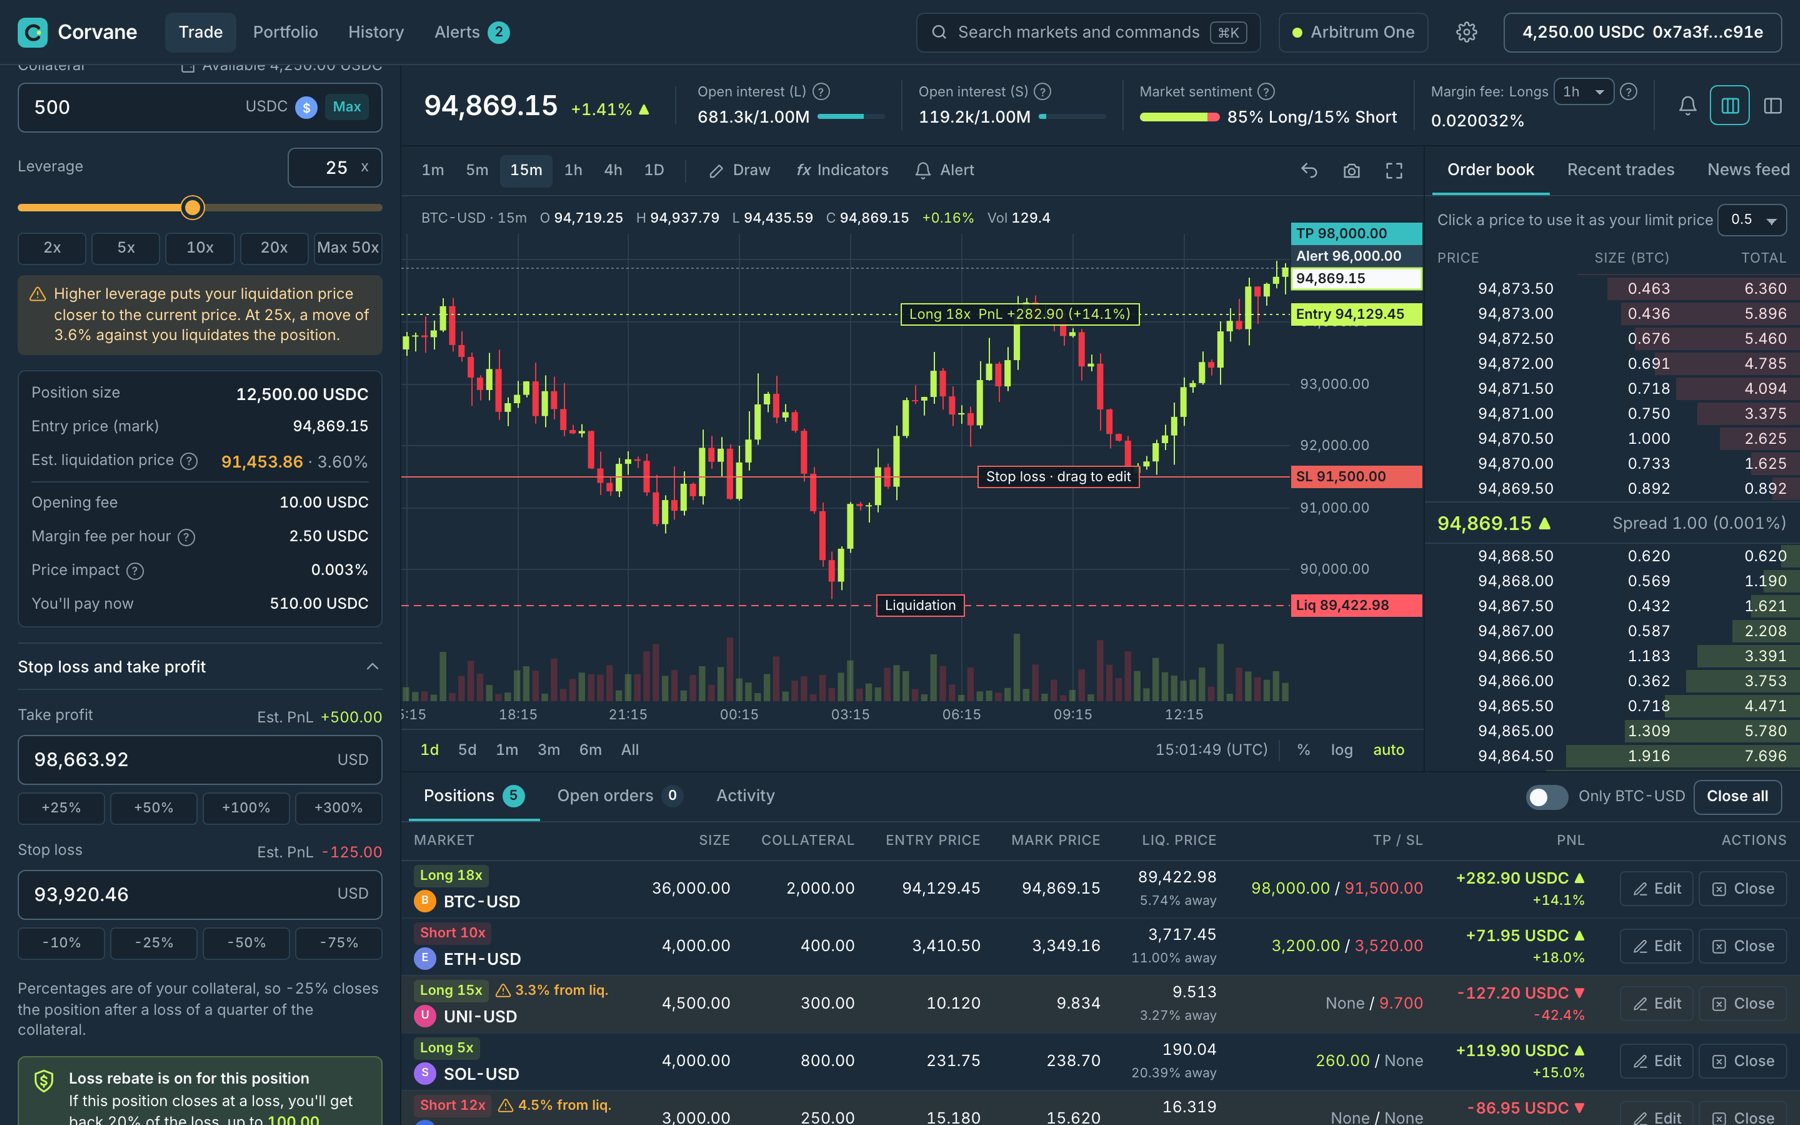
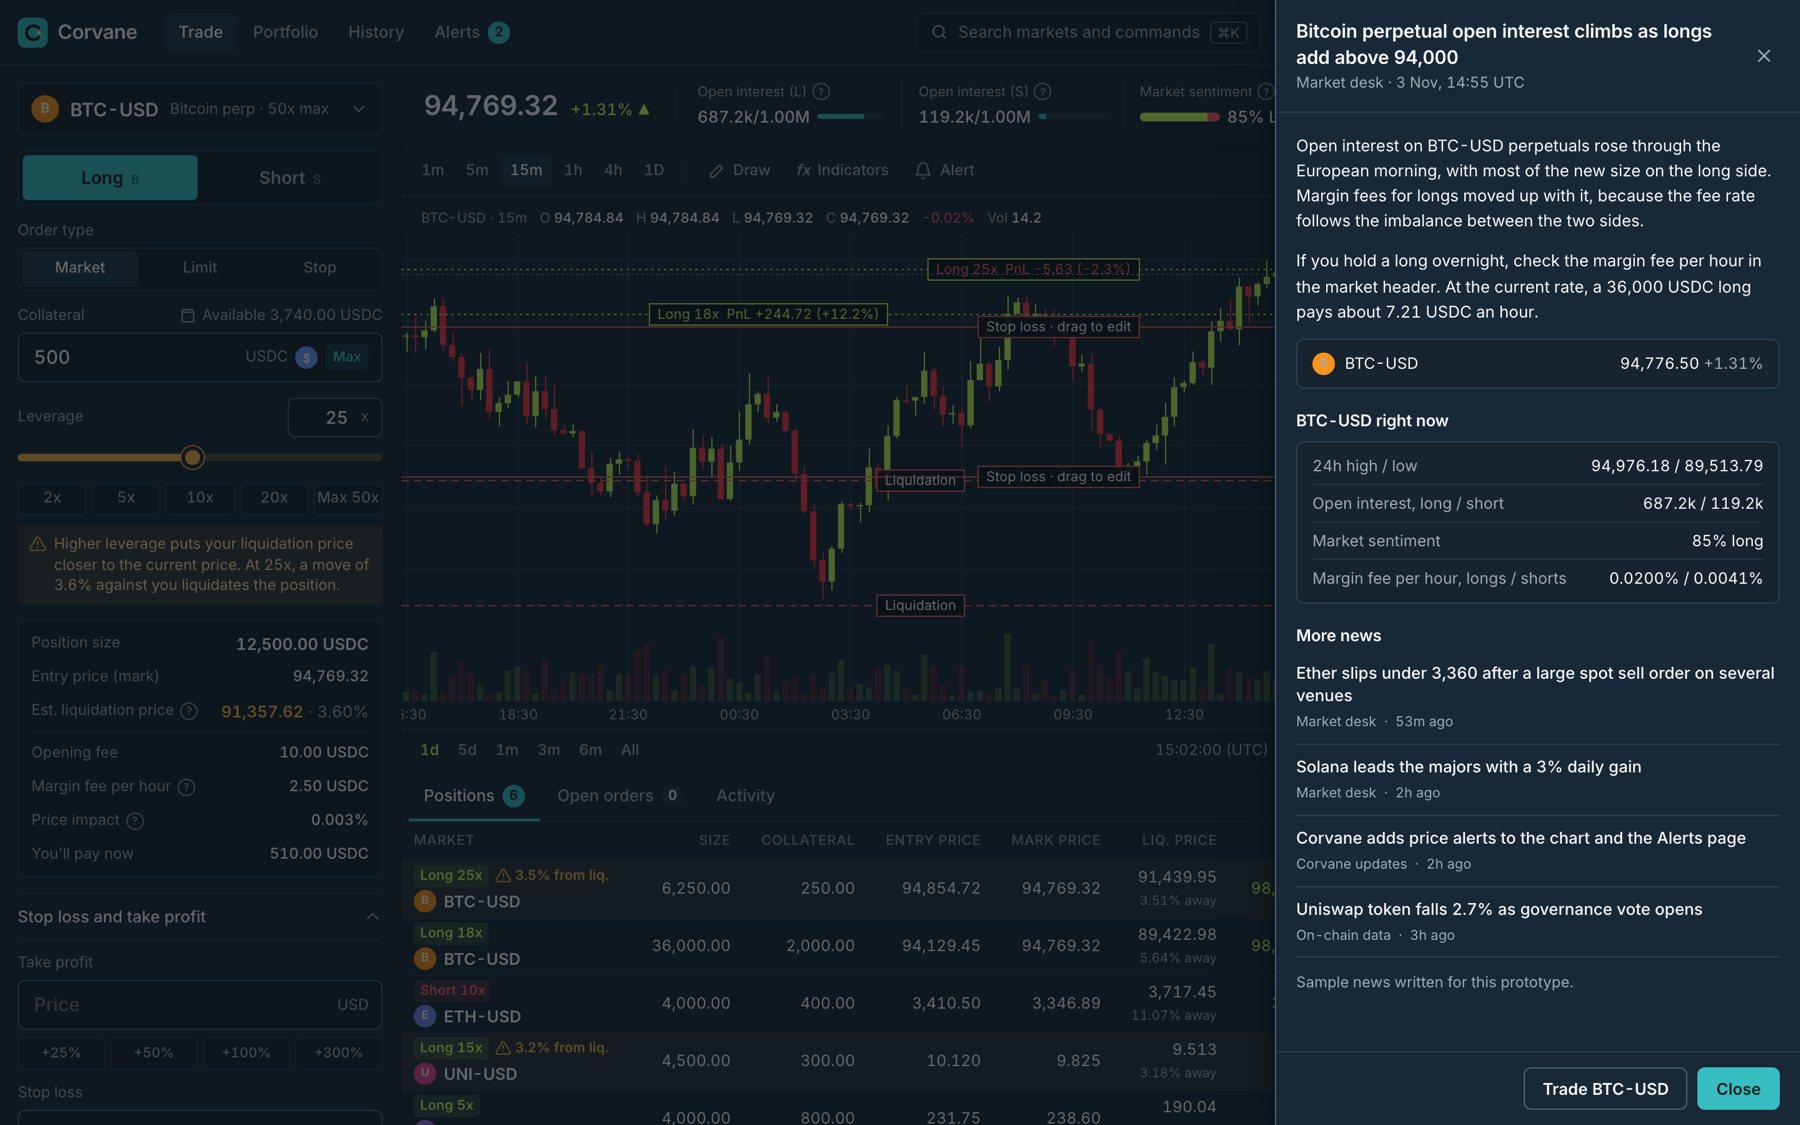
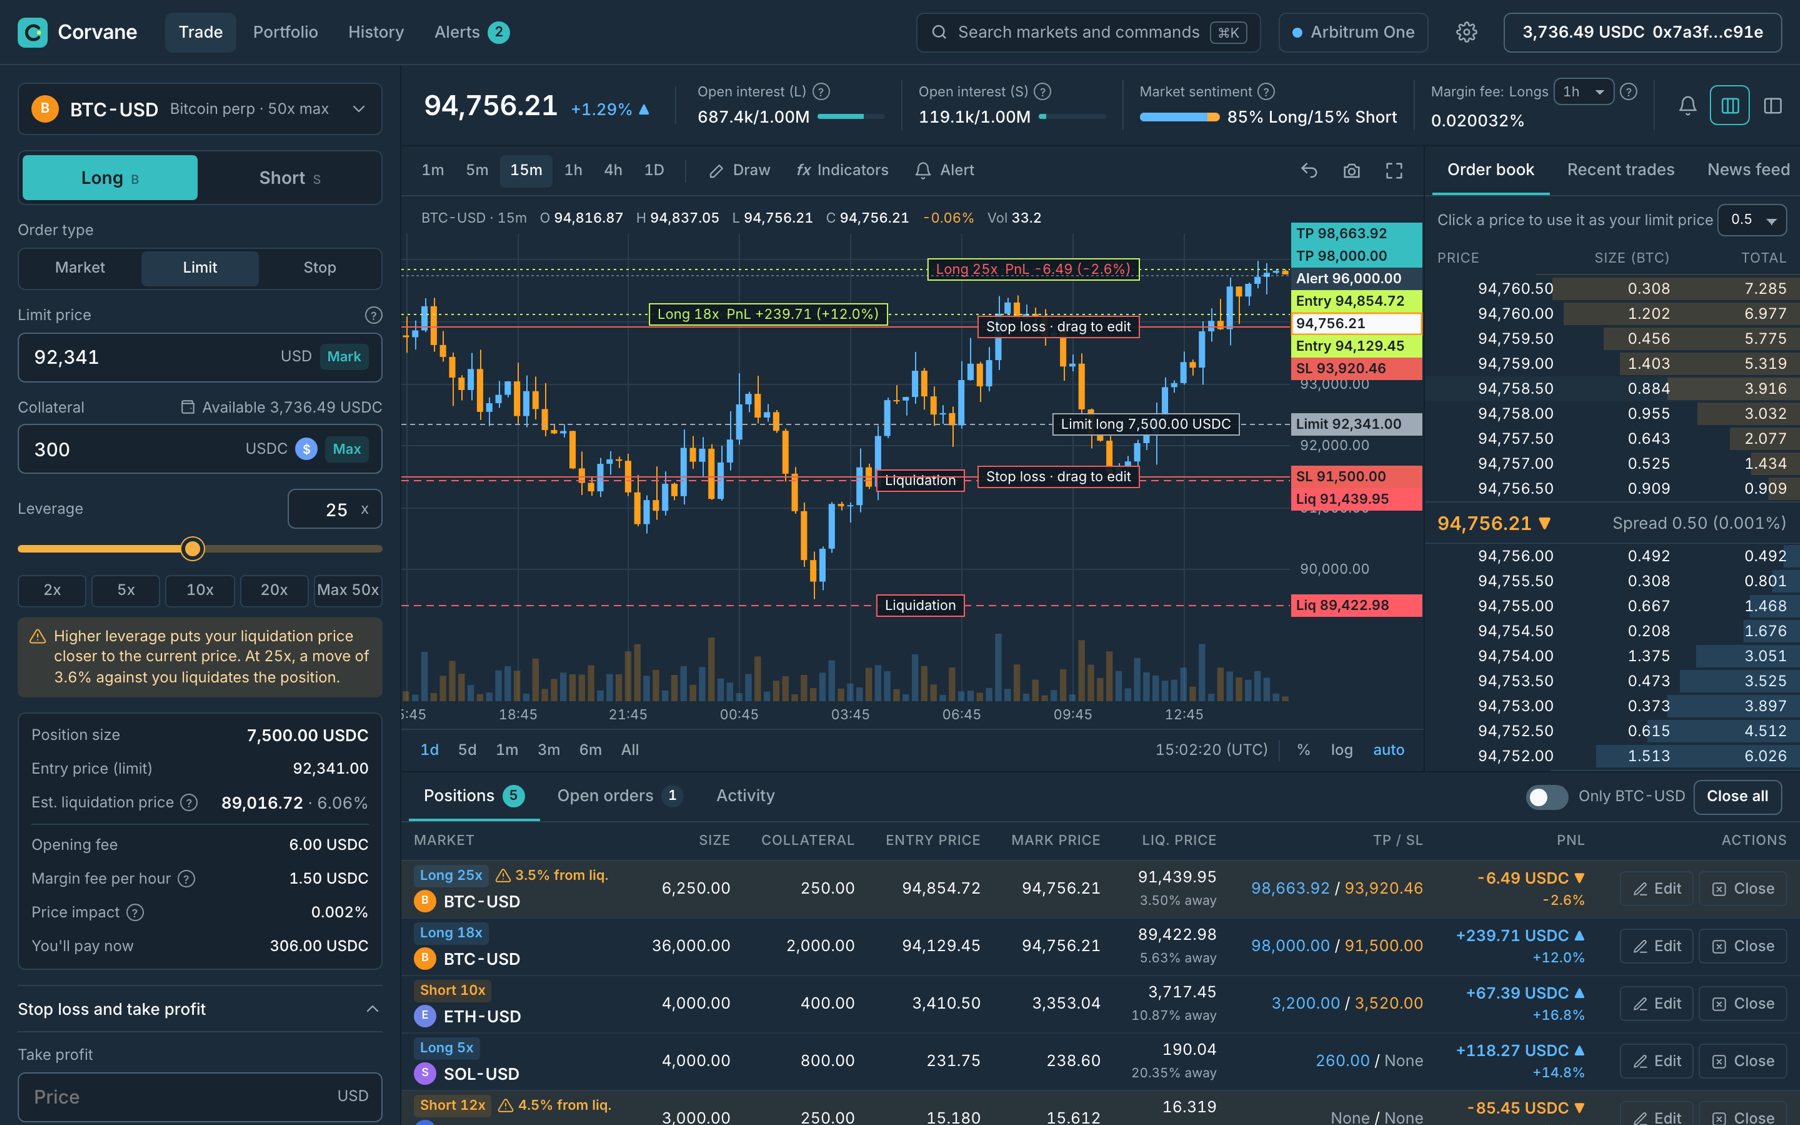
I designed the terminal as one desktop screen in dark mode, with four areas.
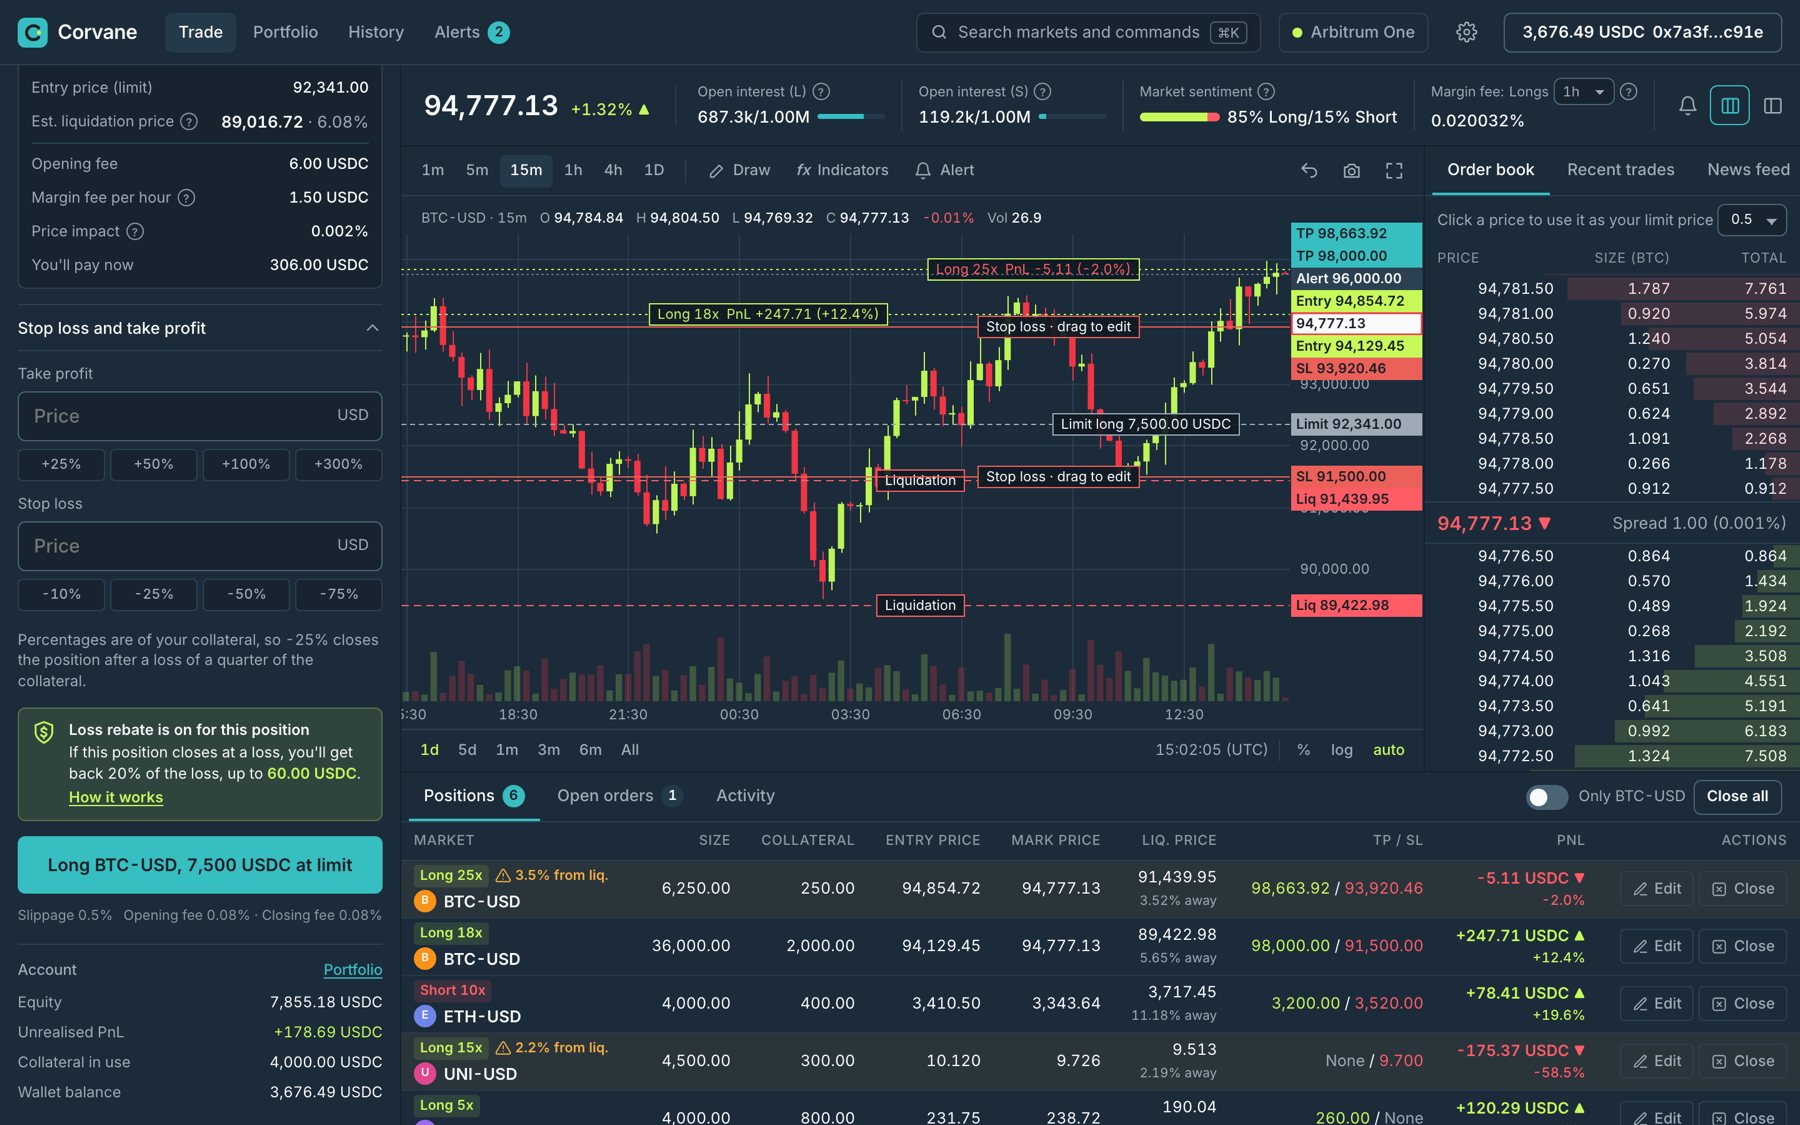
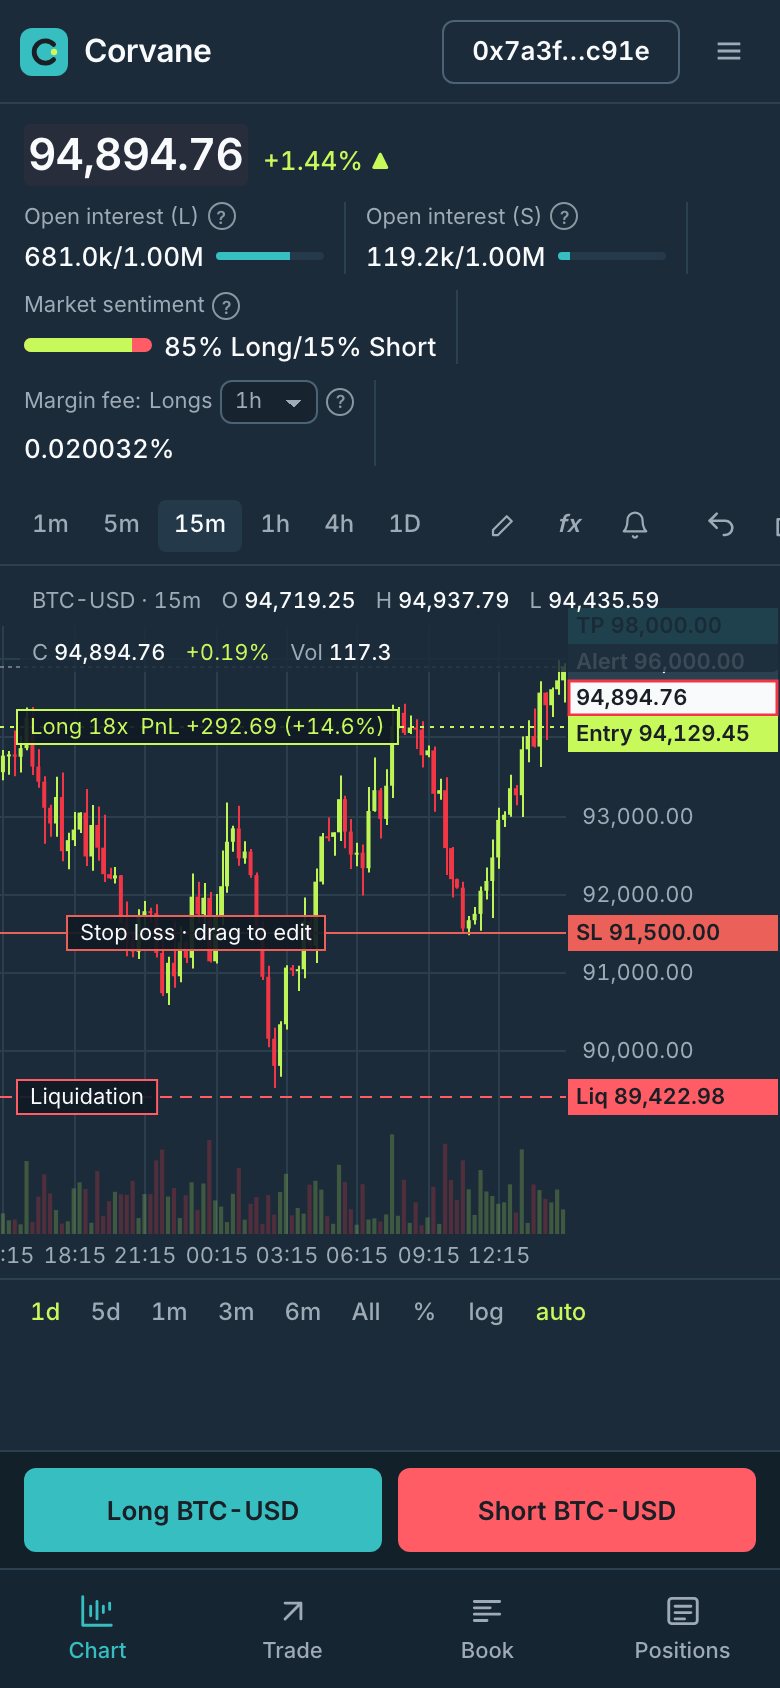
- Market header and chart: The header has the price, the 24-hour change, open interest for longs and shorts against their caps, a market sentiment bar, and the margin fee for longs per hour. Under it is a candlestick chart with drawing tools, intervals, ranges, and log and auto scale, and the entry price of the trader's position is a line with its PnL.
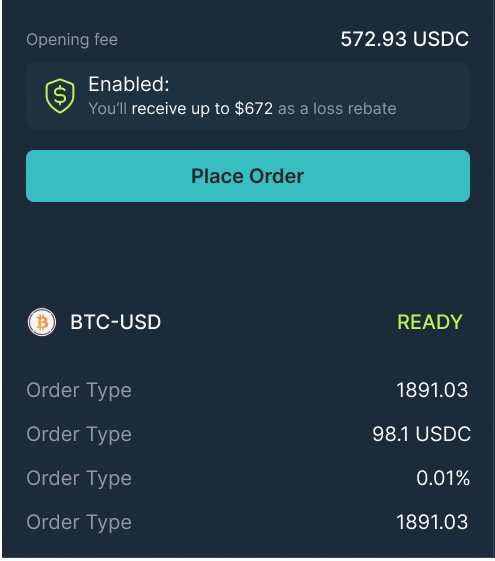
- Order entry: A long and short toggle, the order type, the execution price for limit orders, collateral in USDC with a Max shortcut, a leverage slider from 2x to 50x with a number field, the calculated position size, and a collapsible section for the stop loss and take profit. Under that are the opening fee and the loss rebate, then the Place Order button and an order summary for the market.
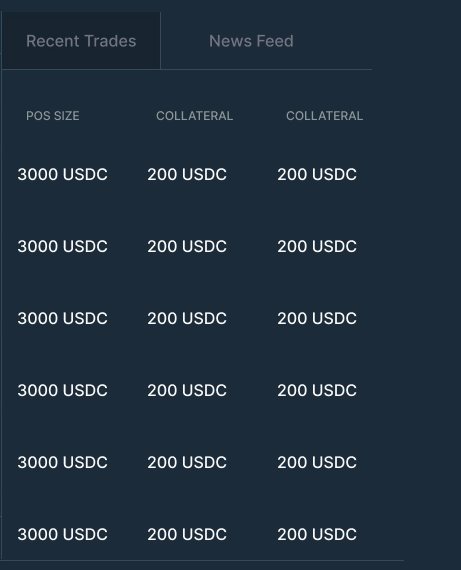
- Recent trades and news: A side panel with one tab for the latest trades and another for the news feed.
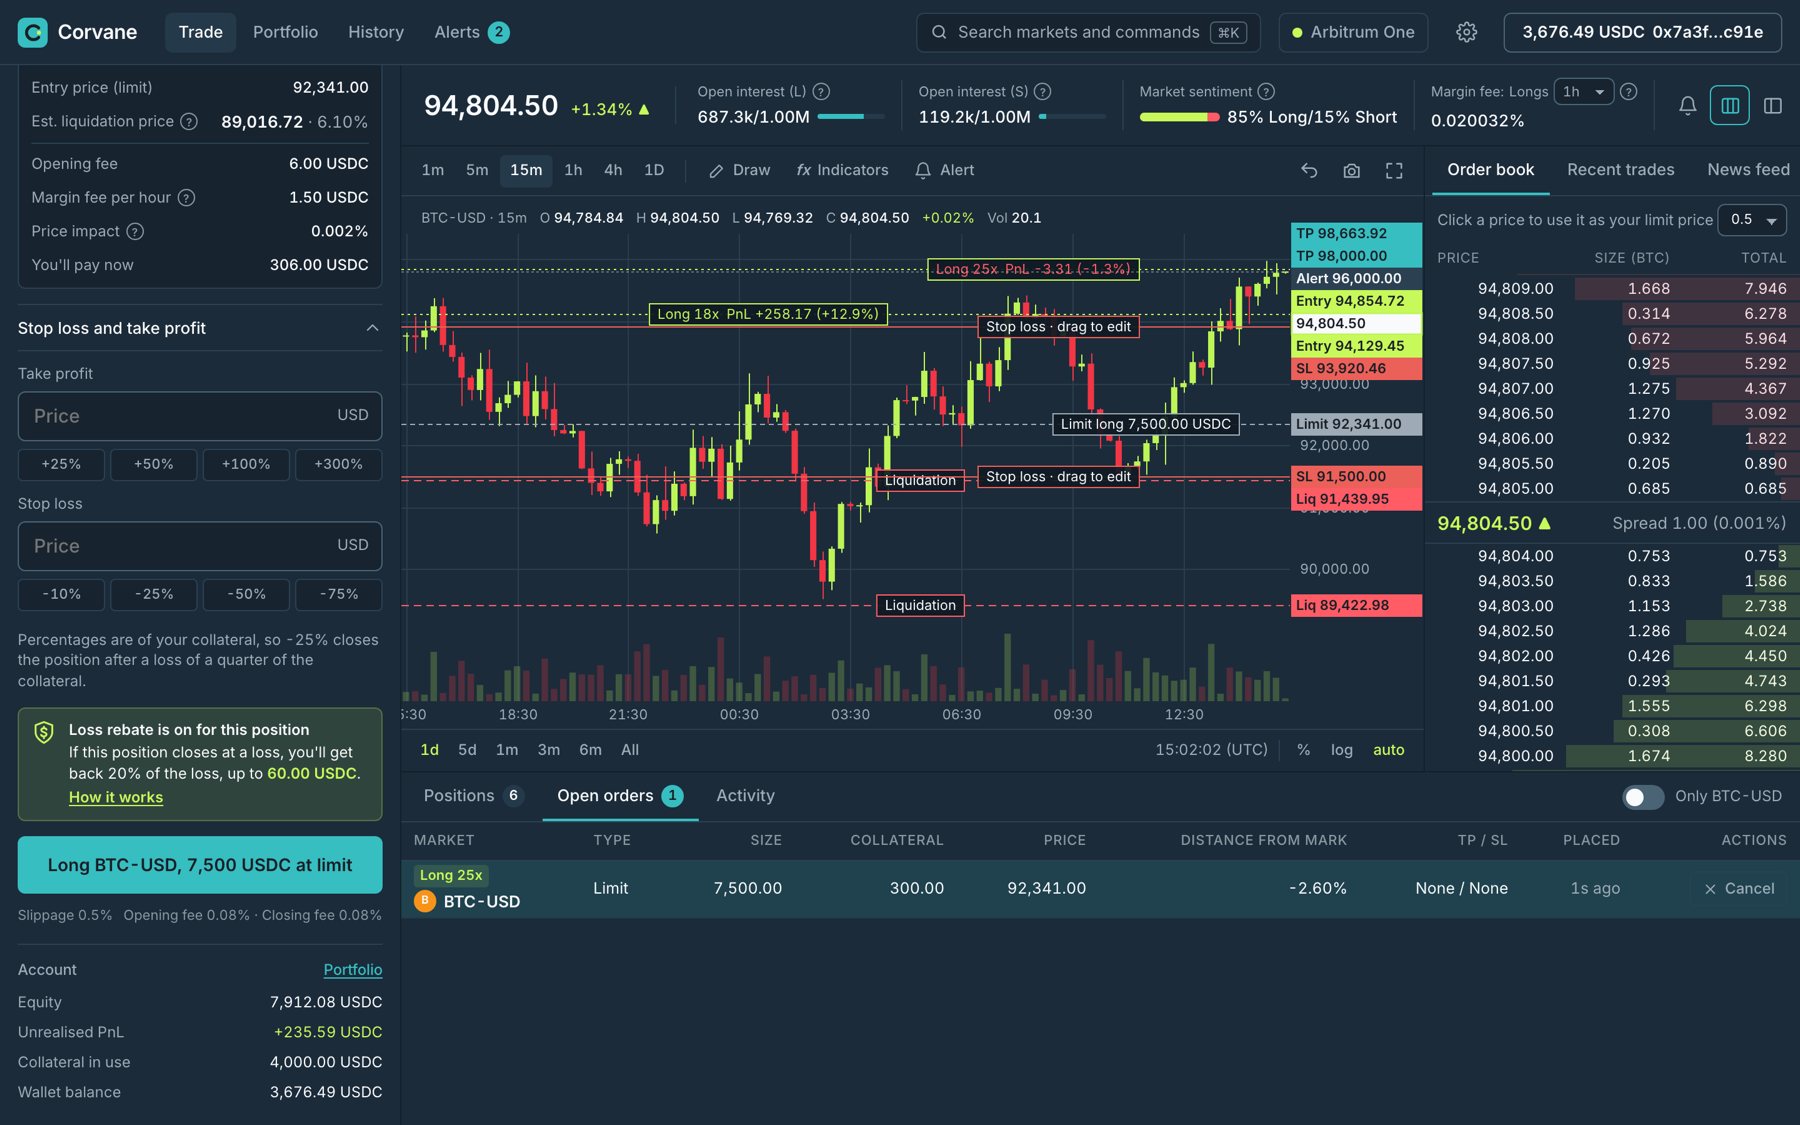
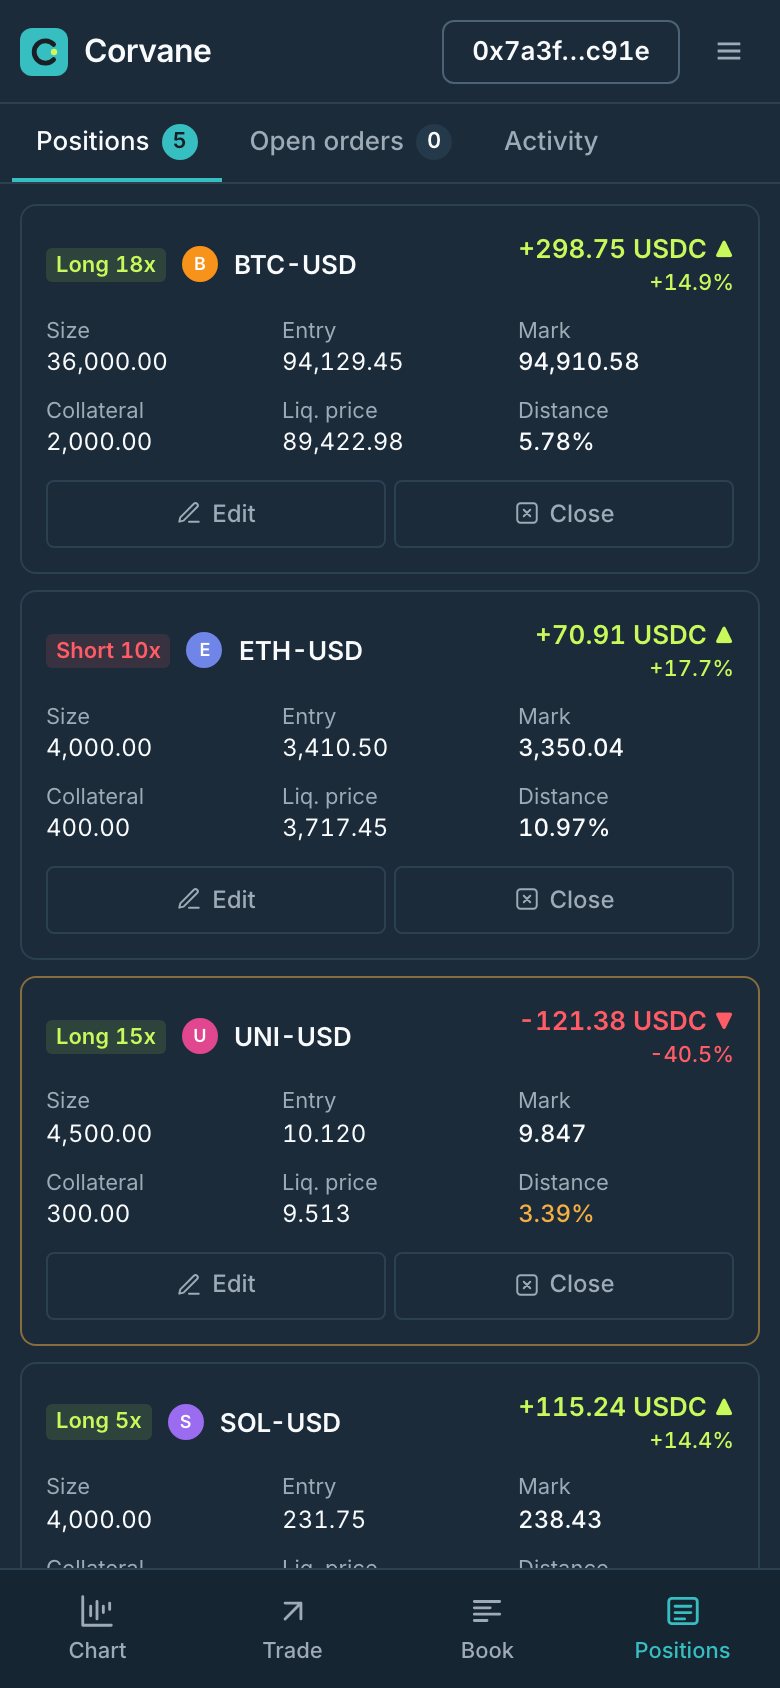
- Positions: A table of current positions with the pair, the direction and leverage, size, collateral, open price, liquidation price, TP/SL, and PnL, with buttons to close or edit each one. A second tab holds limit orders.
How I redesigned it
In 2026, I rebuilt the terminal as a coded prototype. I kept the brand: the navy surfaces, teal for actions, lime for gains, and red for losses and the short side. I set every number in Inter with tabular figures. This way, prices line up in every column. Then I went through the screen area by area.
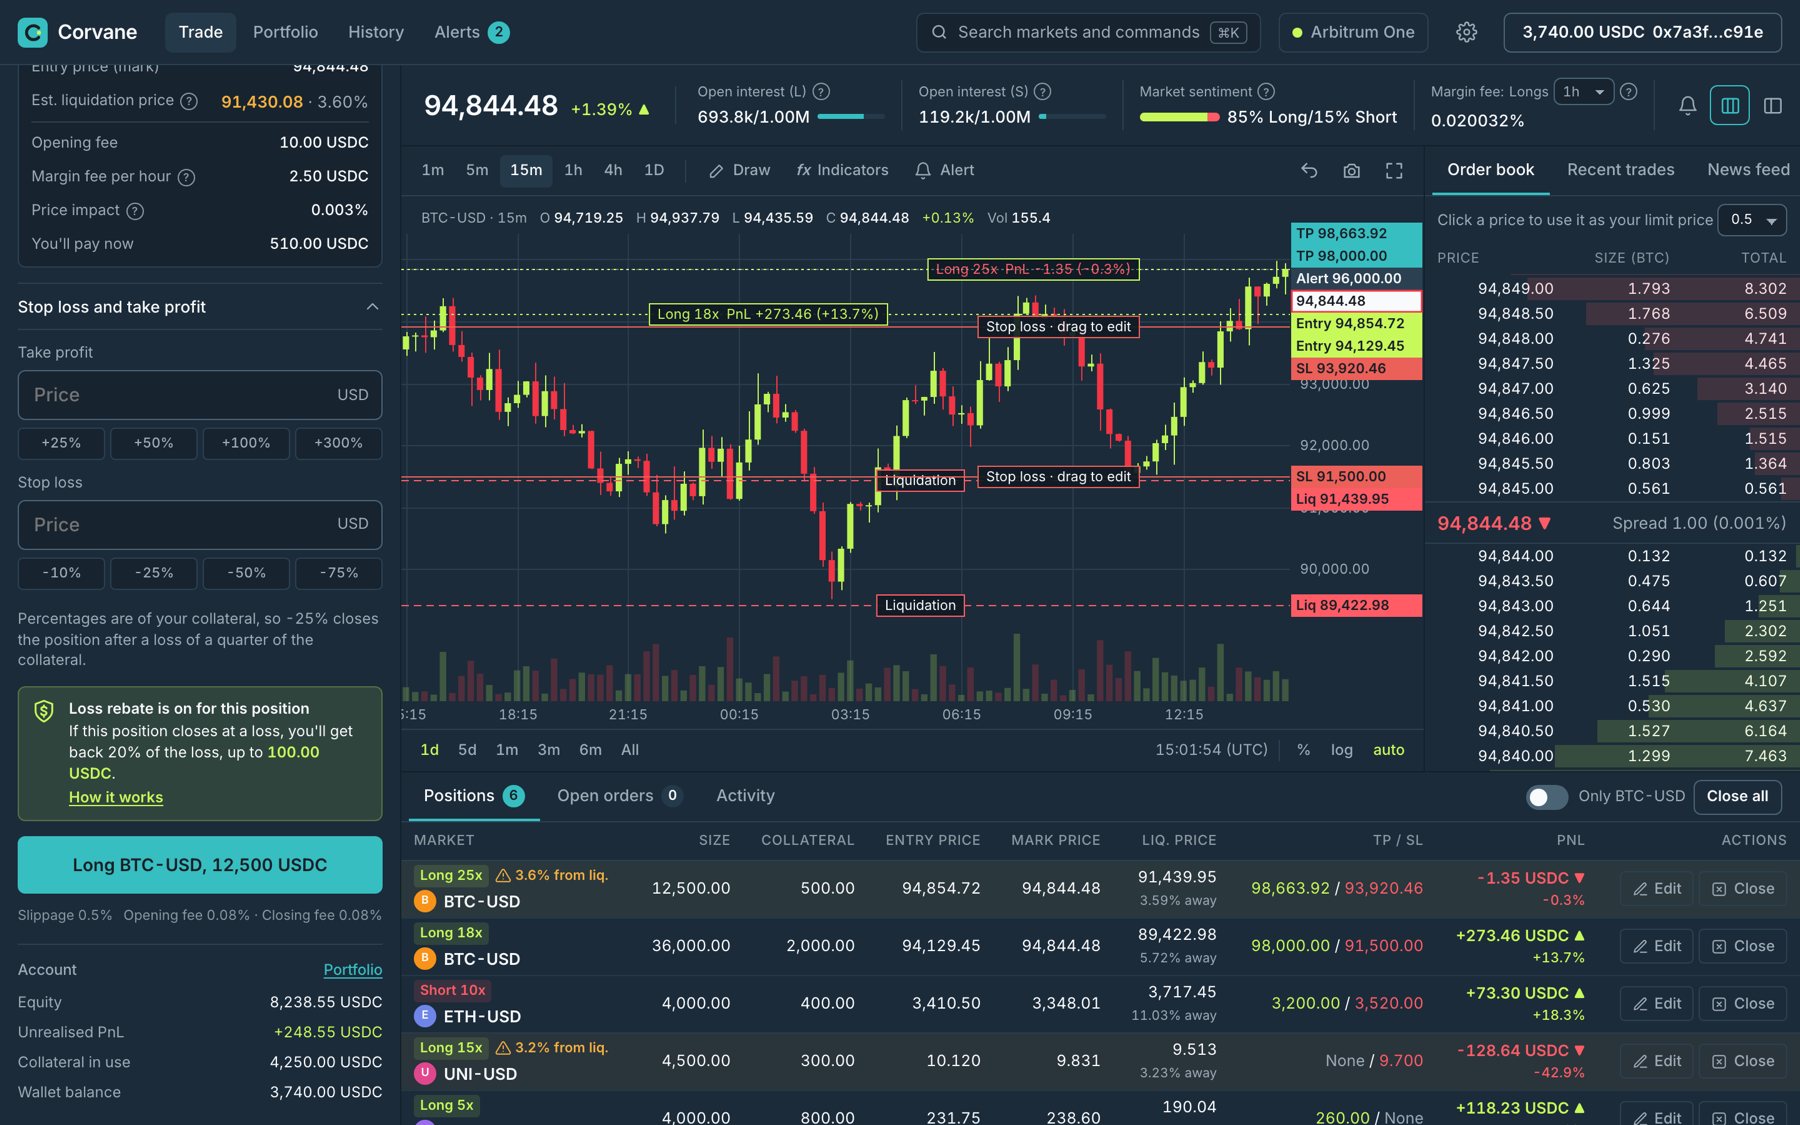
- Prices and PnL: In the original, the header, the chart, and the order panel each had a different price. In the prototype, every number comes from one simulated price feed and the same formulas. Position size is collateral times leverage, PnL comes from the size and the move from the entry price, and the liquidation price comes from the entry price and the leverage. This way, the header, the chart, the order summary, and the positions table always agree, even while the prices tick every second.
- Liquidation price: I moved the estimated liquidation price into the order panel, right under the leverage slider, with its distance from the mark price. As you drag the slider, the liquidation price moves closer, and above 20x the slider turns amber with a note on how far the price has to move against you before the position is liquidated.
- Long and short toggle: In the original, the selected Short had a dark fill and a thin red border, and the unselected Long had bright teal text, so it was hard to read which side was on. The selected side now has a solid fill in its colour, and the other side is grey text. The order button takes the same colour, and you can switch sides with the B and S keys.
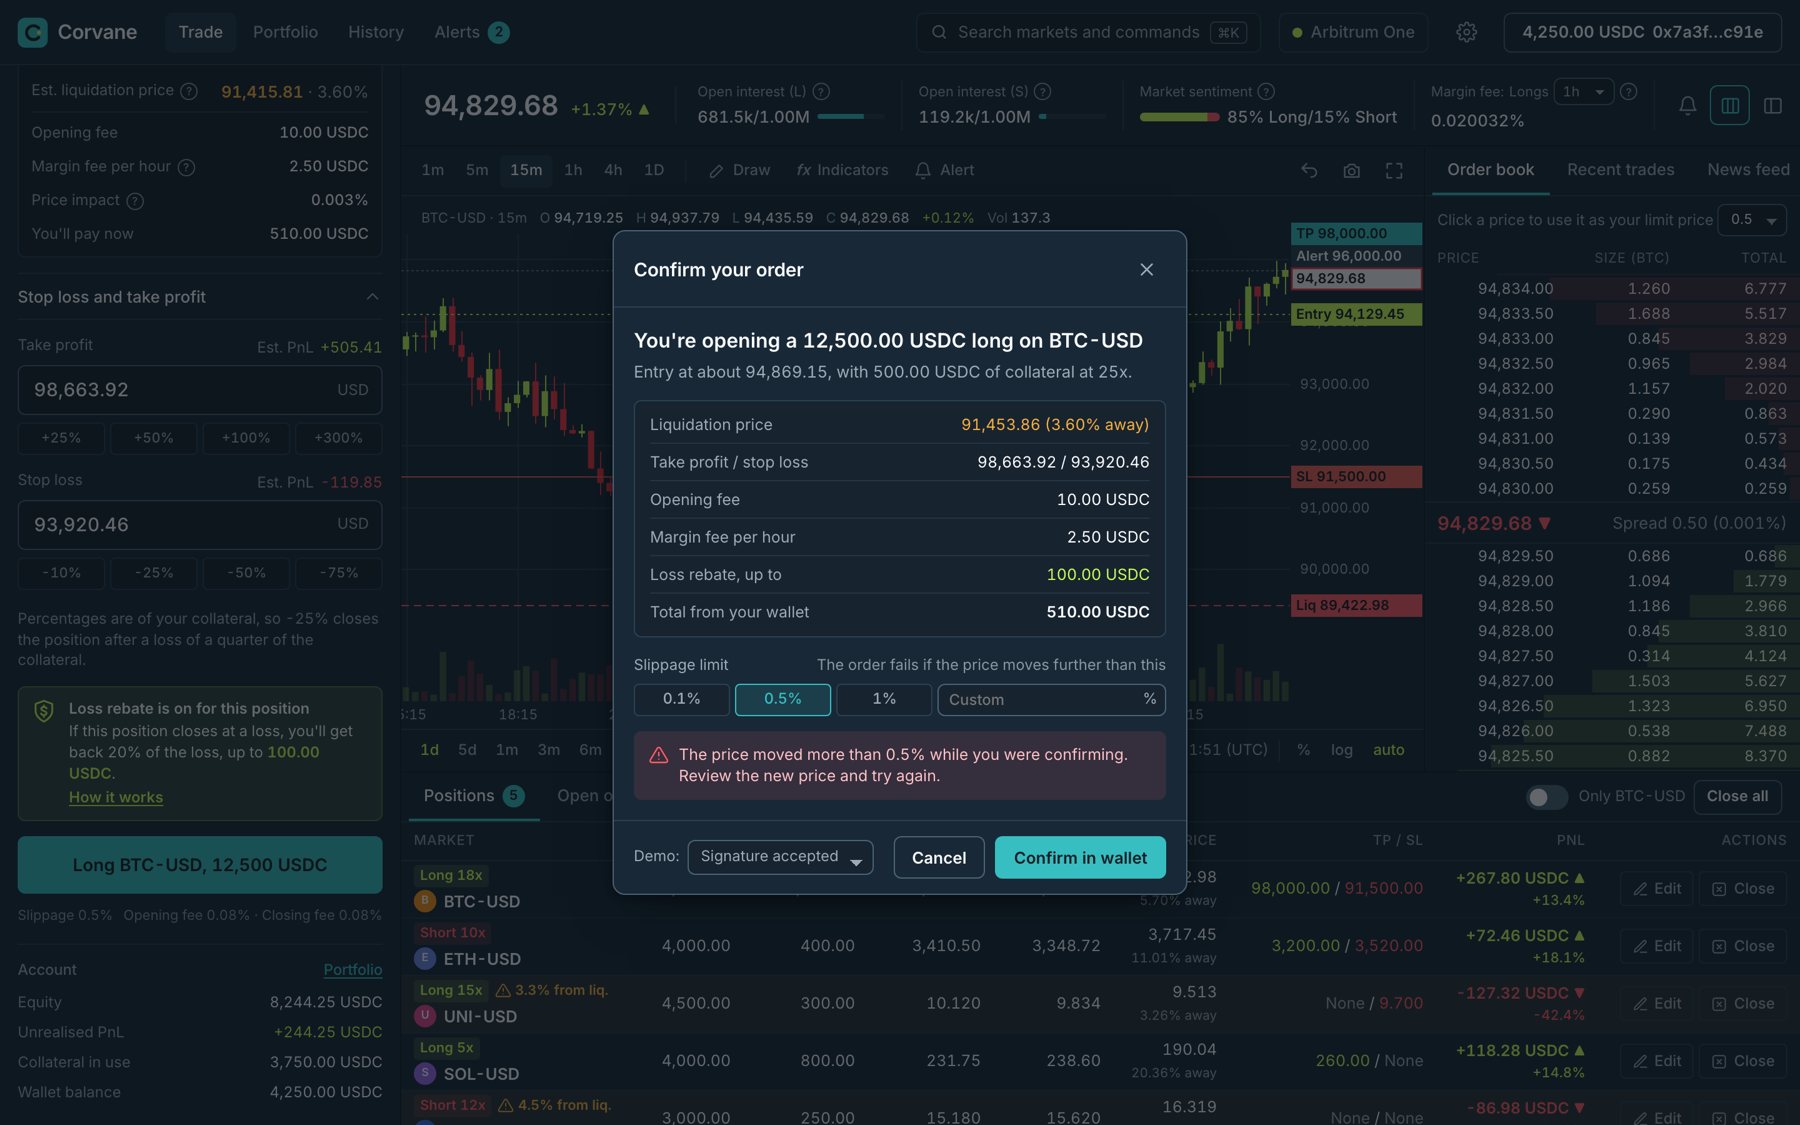
- Order button and confirmation modal: The original button read Place Order for every order. It now reads the order itself, like "Long BTC-USD, 36,000 USDC". Pressing it opens a confirmation modal that starts with the outcome in plain words. The fees, the liquidation price, the margin fee per hour, and the slippage limit are below it, for traders who want to check them before they sign in the wallet.
- Validation: The original screen had 2,000 USDC of collateral entered against a balance of 450 USDC, with no error. Now the error on the collateral field includes your available balance and the amount the order needs, including the opening fee, and the button is disabled until the amount fits. I also designed the edge cases a trader can run into, like a stop loss past the liquidation price, a position over the open interest cap, a rejected signature, and a price that moved while the trader was signing.
- Labels: The order summary had "Order Type" on every row, and the positions table had LIQ PRICE twice. Every row now has its own label, like Entry price and Mark price, and the summary is above the button, because that's the point where the trader reads it.
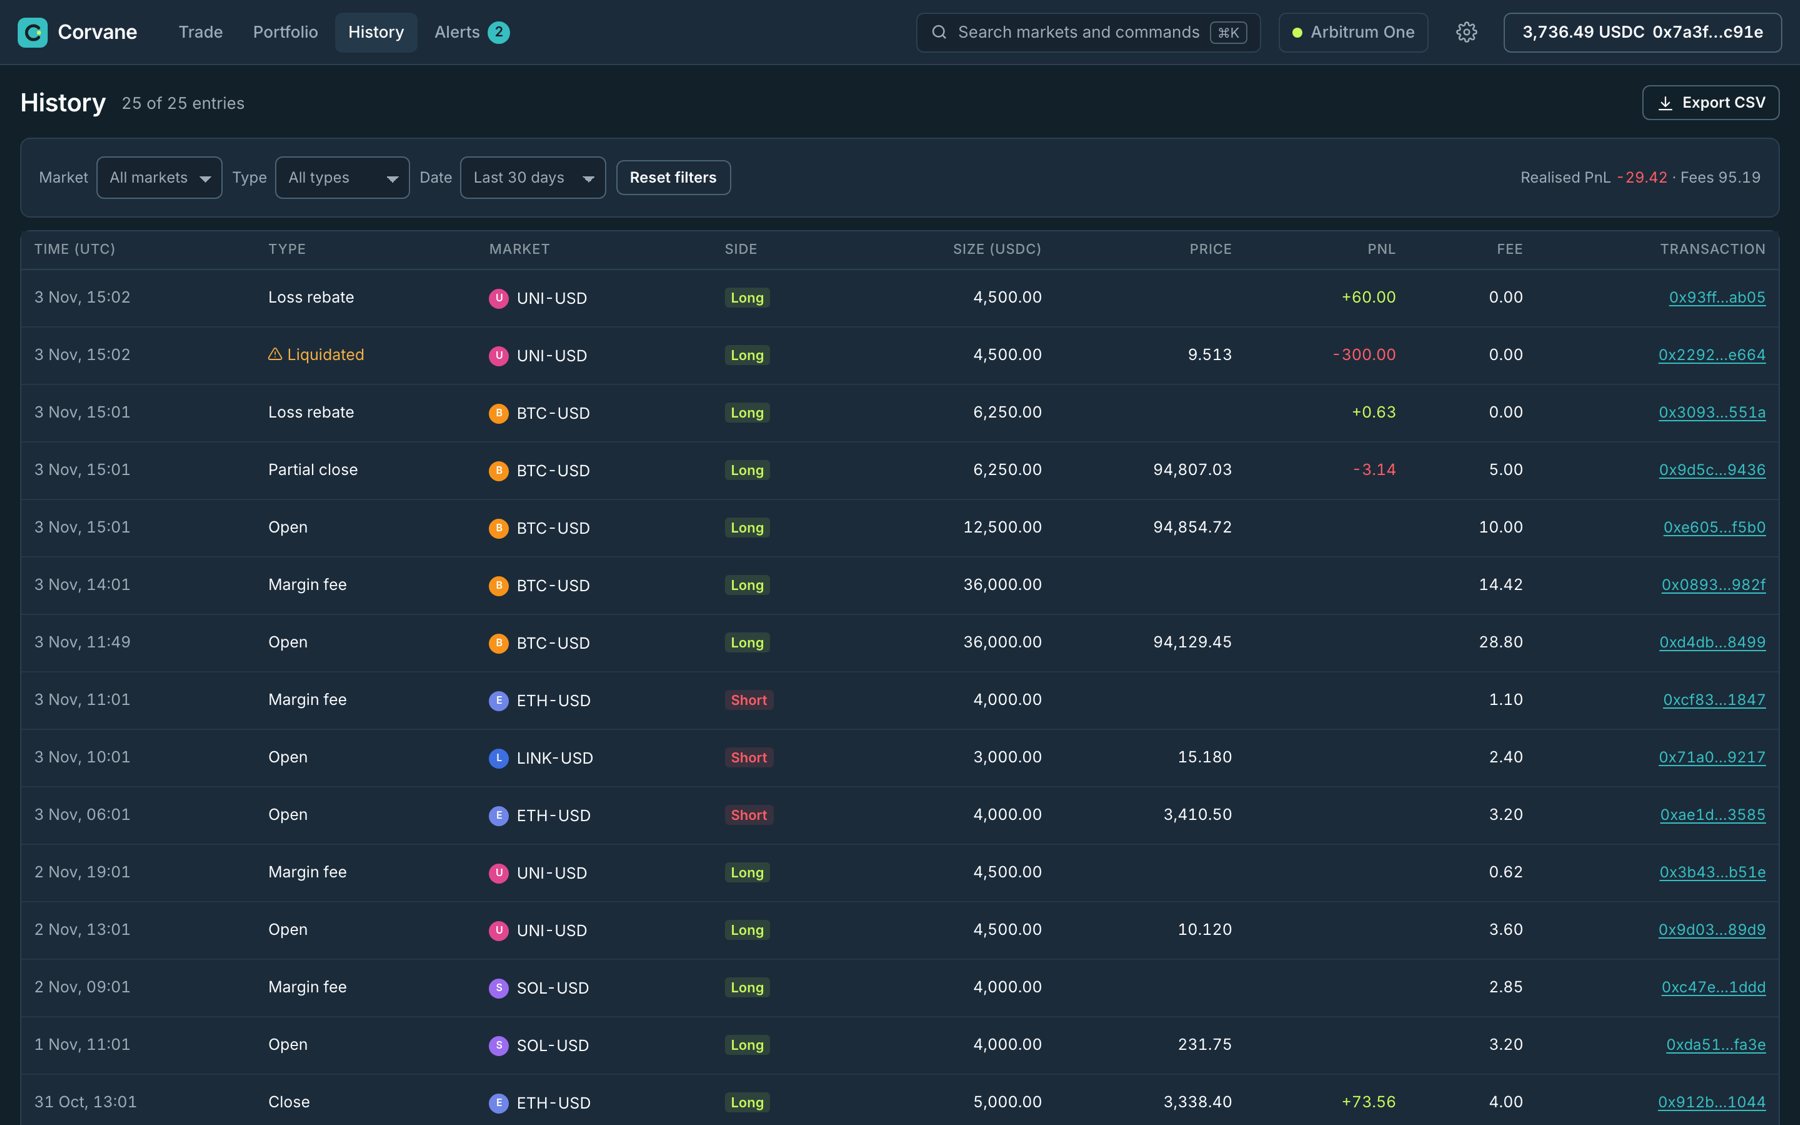
- Loss rebate: The original card read "You'll receive up to $672 as a loss rebate", without the rule behind it. The prototype uses a sample rule. If a position closes at a loss, Corvane pays back 20% of the realised loss, up to 500 USDC per position. The card has the largest rebate for the collateral you've entered and a How it works link. Rebates are their own lines in History.
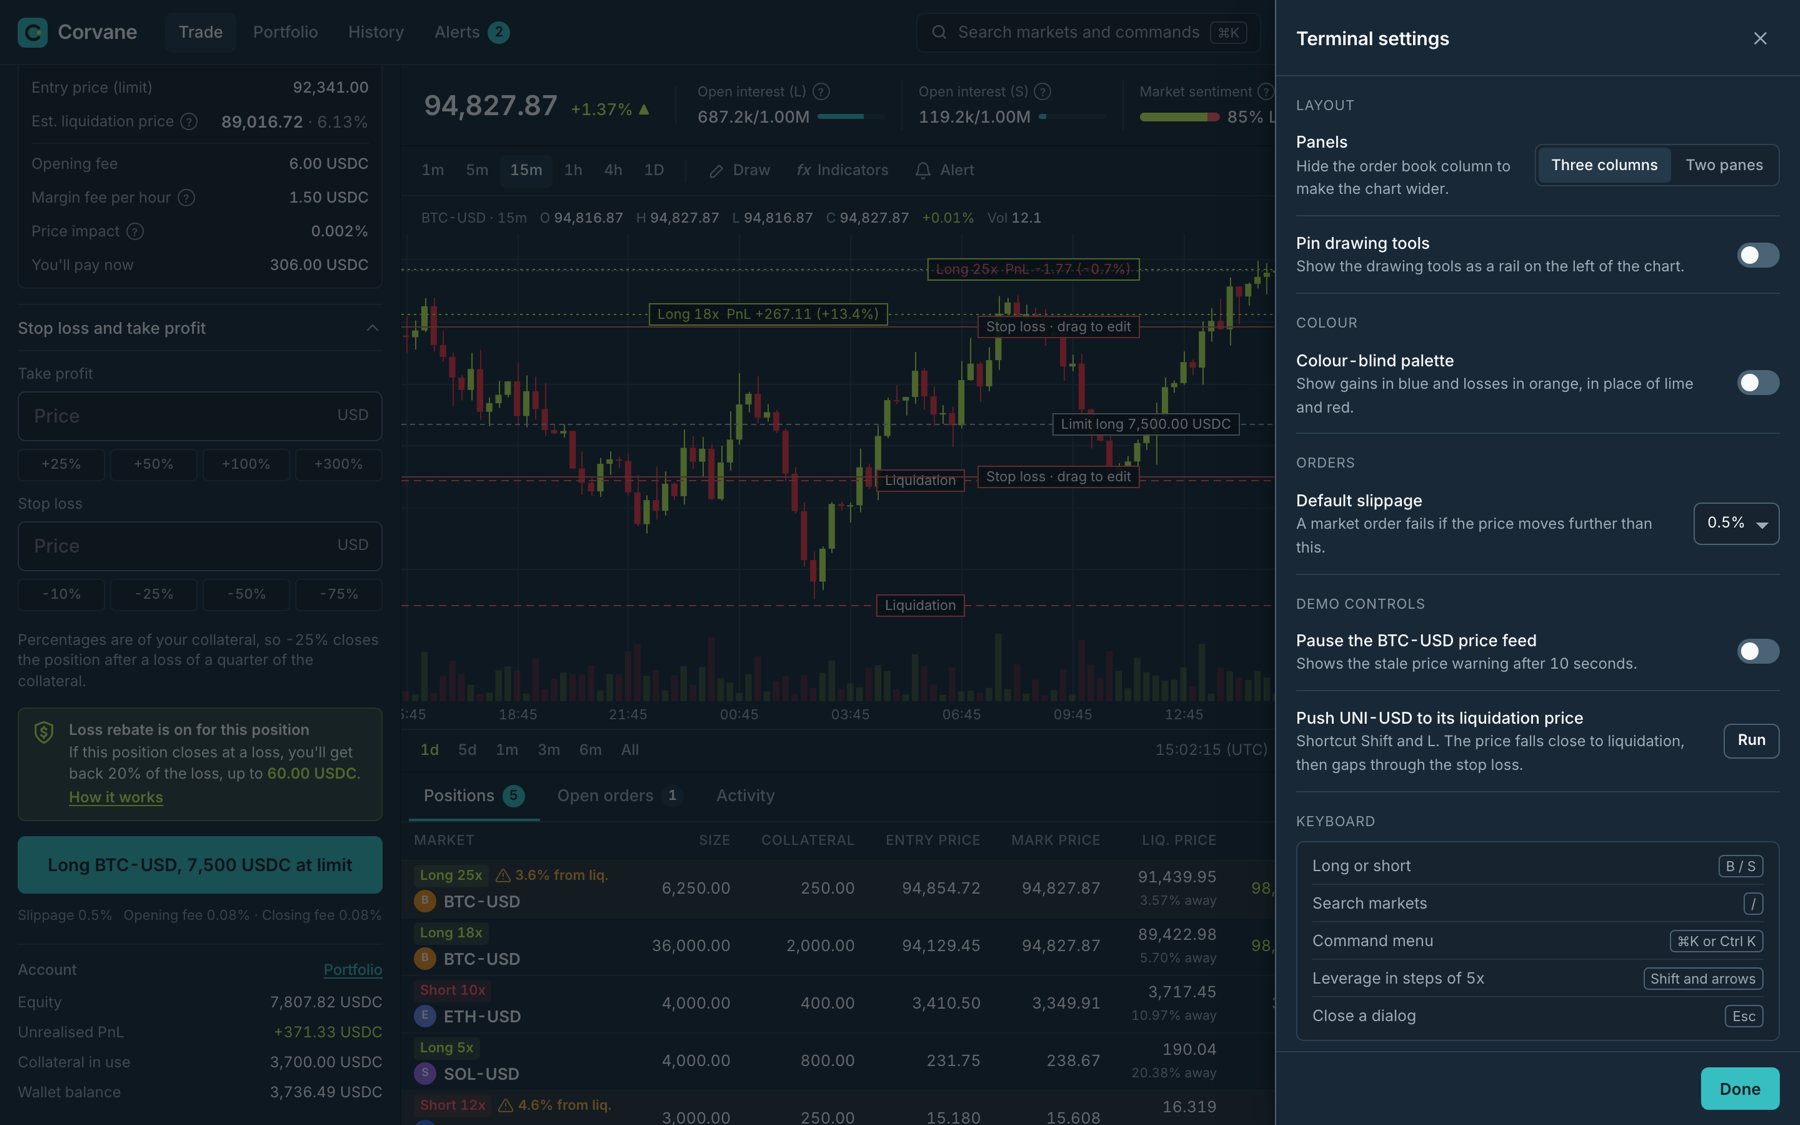
- Contrast: Several labels in the original, like the table headers and the red short tag, were under a 4.5:1 contrast ratio, and the input borders were close to invisible. I raised the grey and red text values and the borders, and I paired every gain and loss colour with a sign and an arrow. This way, a trader who can't distinguish lime from red can still read the sign. In the settings, there's also a colour-blind palette with blue for gains and orange for losses.
- States: The original only had the happy path. The prototype has the wallet connection with a wrong network banner, loading skeletons, empty tables, a pending transaction, a stale price warning, and a tinted row with a warning icon for any position within 5% of its liquidation price. If the price gaps through a stop loss, the position is liquidated and the trader gets a notification. The liquidation and the rebate both go into History.
- Chart: You can change the interval and the range, switch the price axis to percent or log, and hover a candle for its open, high, low, close, and volume. Your entry, liquidation, take profit, and stop loss prices are lines on the chart. You can drag the take profit or stop loss line to a new price and confirm it. The drawing tools are in a Draw menu, and you can pin them to a rail in the settings.
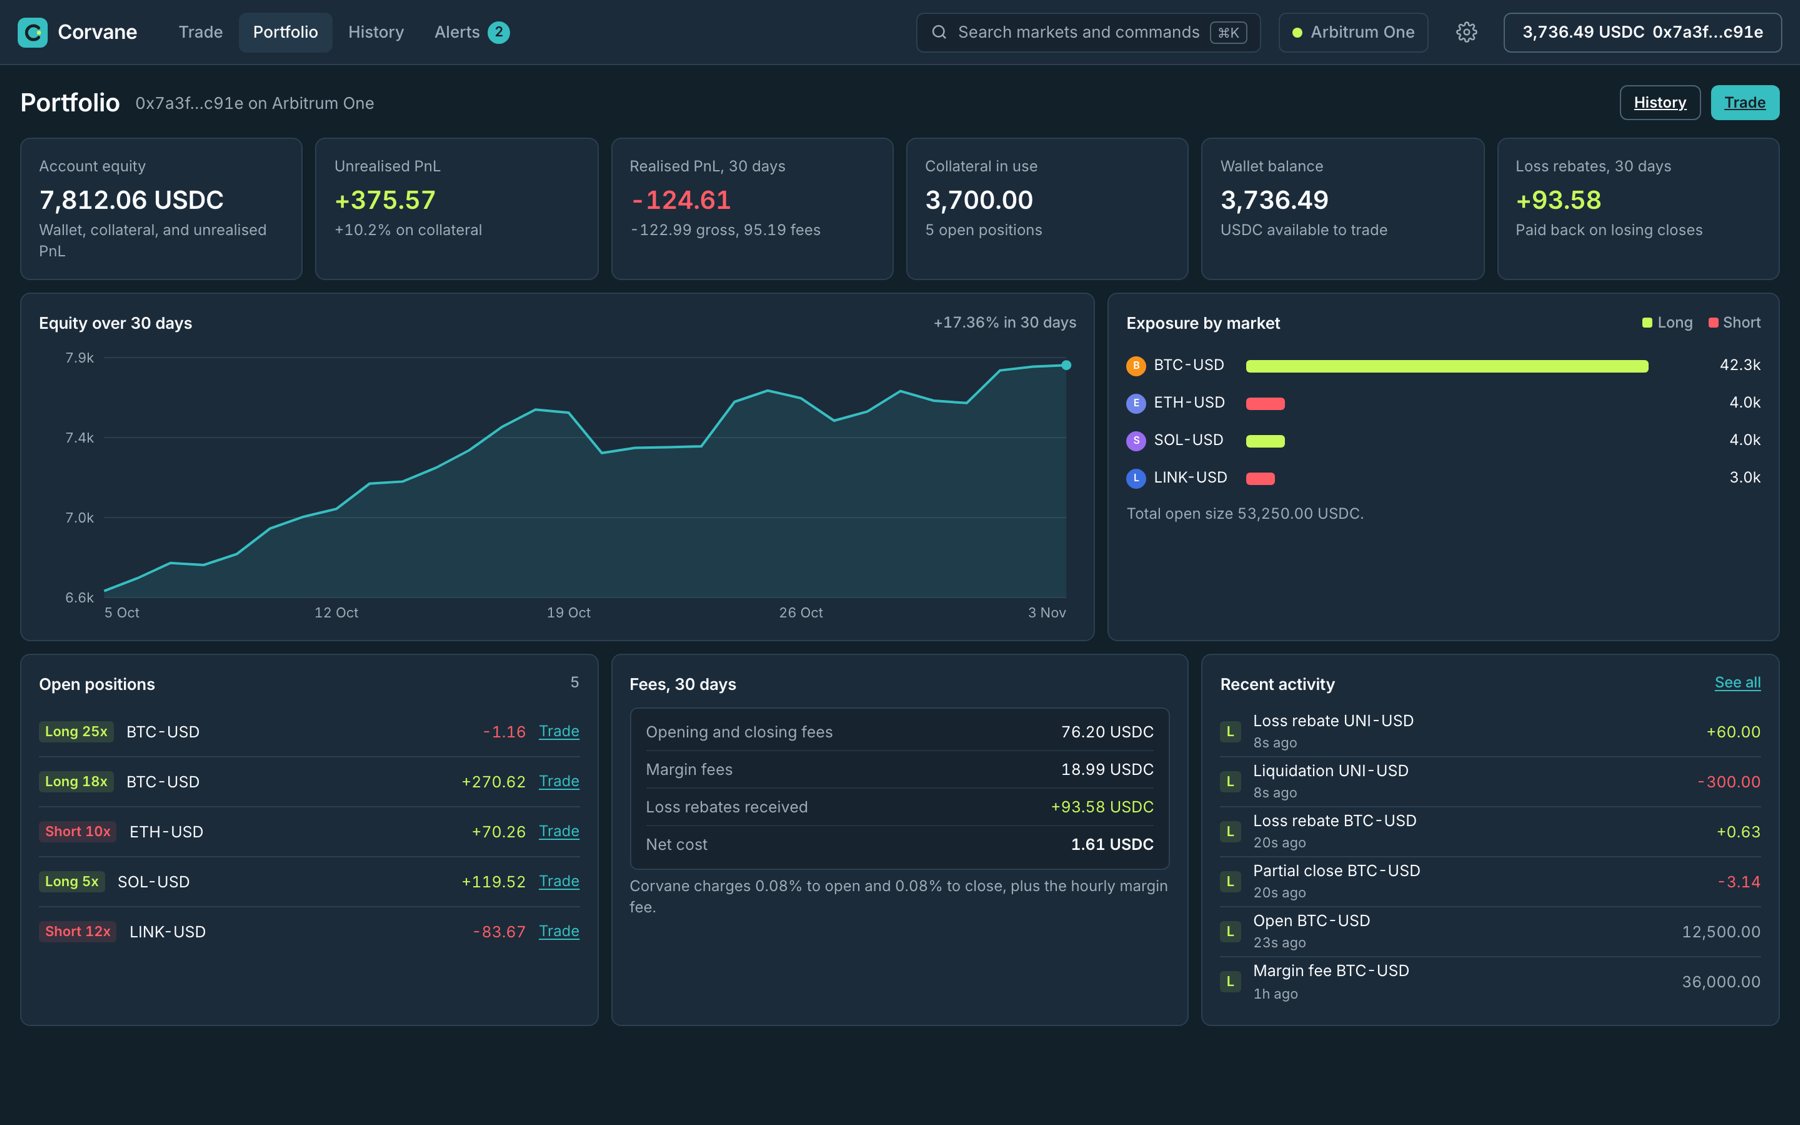
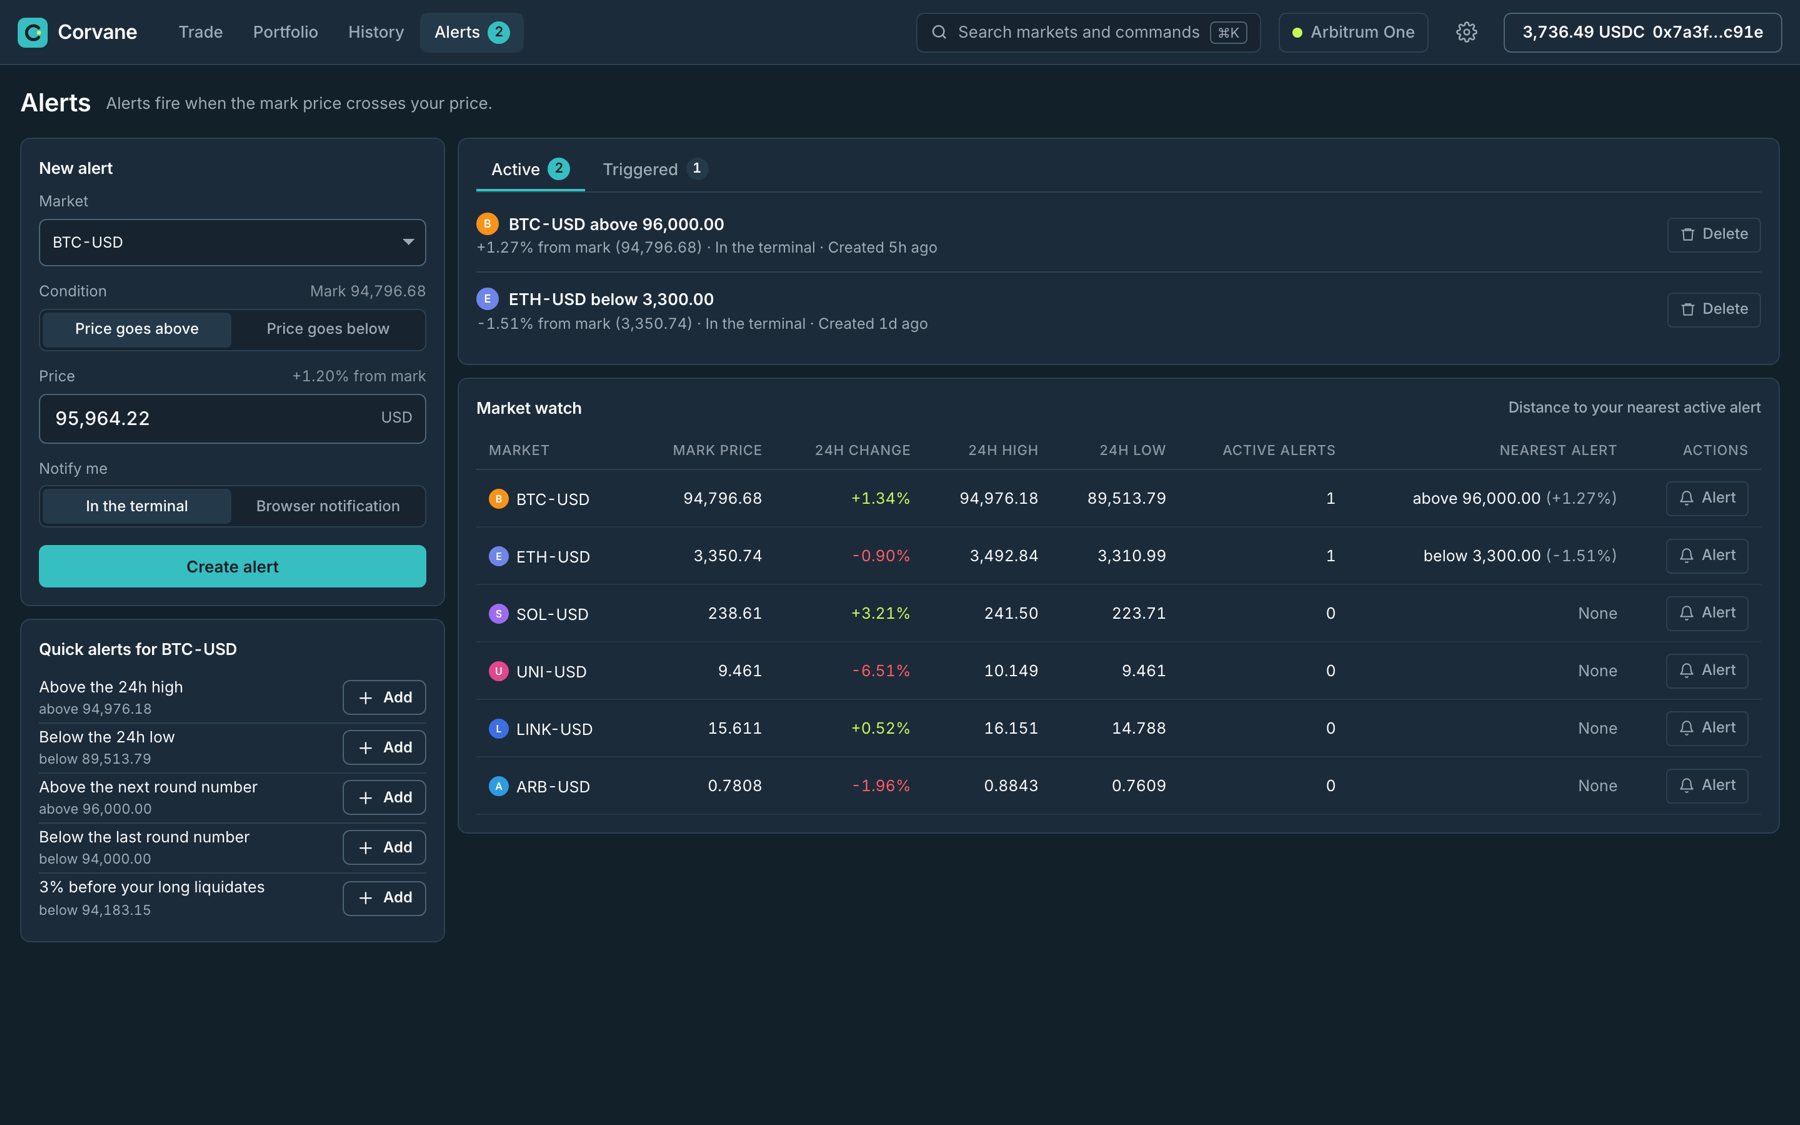
Order book and the rest of the product: I added an order book tab next to recent trades, and you can click any price in it to use it as your limit price. I also added a portfolio page with equity over 30 days and exposure by market, and a history page with filters and a CSV export. Price alerts are on the chart and on their own page. These weren't in the original design, and they're the pages traders go back to after the trade.
Layouts: At 1440 and 1280 pixels wide, the terminal has three columns, and you can hide the order book column to make the chart wider. On a tablet, the chart and the order book stack next to the order panel. On a phone, there are tabs for Chart, Trade, Book, and Positions, with a Long and Short bar under the chart.
Impact
I ran usability tests on the prototype with eight traders. The median time to open a 10x long with a stop loss went from 74 seconds on a rebuild of the original layout to 41 seconds on the redesign. All eight traders finished the task on the redesign, compared with five on the original layout. Seven of eight could name their liquidation price before they confirmed, compared with two on the original, and the SUS score went from 64 to 82.
The 2026 prototype is my own redesign. It runs on sample data and a simulated price feed, and Corvane is the name I gave the product for the rebuild.

Need this level of detail in your product?
Work through the hard product decisions early.
If you’re a product team, that can mean a focused design, system, or prototype project. If you’re hiring, it’s a chance to look closer at how I work across research, interfaces, and code.